
beckybuildscosplays
Becky Builds Cosplays
Randomness and Cosplay!
52 posts
Don't wanna be here? Send us removal request.
Last Seen Blogs

daveman-music
DAVEMAN

octocotta
wanna kiss this man so bad but he dont exist

adeees
Don't forget about me.


lorde-stories
lorde enthusiast
Photo


Just finished a quick Pepakura template for a friend! She is cosplaying the dancer from Bound. The game devs were kind enough to provider her with some high res STLs (which I can’t share, unfortunately) as shown in the second picture. I used Blender to retopologize the model into something workable, then scaled and modified the parts to fit a human head. While you can’t see it in this render, there is also a harness to connect all the pieces and hold them on the wearer’s head. Finally, the parts were unfolded in Pepakura and color-coded for different cuts and other information. Show here are the ear fin templates which are the most complex parts--RIP, friend. If people were to commission me for patterns, this is what they could expect! I can also take them a step farther and include assembly instructions, but it wasn’t necessary for this person :) I can’t wait to see what she makes with this!
19 notes
·
View notes
Text
3D Printable Cosplay Tools
When most people think about 3D printing and cosplay, they imagine all the fantastic props and costume parts you can make. However, there is a plethora of 3D printable objects that can make your life easier when it comes to custom building cosplays. Here is a long list of items I have discovered that I’m slowly adding to my workshop. Whenever possible, I selected objects that are parametric (aka, they can be edited to fit your specific needs). Bear in mind that there are tons of amazing things you can print like CNC mills, drill-based lathes, looms, animatronics, you name it. I have selected simple, handy items for this list that anyone can print in an afternoon. It is by no means exhaustive, but it should be a good start. Happy printing! <3
Sanding
Customizable Sanding Sticks: Great for reaching tight spots, interior corners, and all the little nooks and crannies in your objects.
Sandpaper handle: A larger, flat version of the sanding sticks. This is an ergonomic assistant for holding regular sandpaper.
Bow Sander: A useful sanding tool for rounding off corners or sanding internal slots. This one is small, but still handy.
Measuring
Cylinder Center Finder: Like the title says, use this to find the center of any cylindrical object.
Center Finder: A center-finder for flat stock (think 2x4s)
Ruler Calipers: Turn any ruler into a rudimentary set of calipers
Profile Gauge: This one is admittedly low resolution, but it will work in a pinch! Use it to measure curves and contours so you can recreate them on a separate object. (think symmetry on a complex model)
Radius Gauge: Used to measure the radii on pre-existing objects. Could be useful if you build a lot of mechanical objects.
Holding
Soldering Tweezers: This will hold two wires in place leaving both your hands free to manipulate solder and a soldering iron.
Drill Jig for PVC Pipe: Need to drill some holes in PVC? Use this to keep your drill steady.
Miter Box for X-Acto Saw: This box has several slots to help you make perfect 90, 60, and 45 degree cuts in small materials like aluminum or brass tubes.
Stackable Painting Pyramids: Use these to elevate your part and prevent icky bottom edges.
Tools
Mini Hack Saw Handle: No hacksaw? No problem!
Push Drill with Adjustable Chuck: Power tools can be both expensive and intimidating, so use this for drilling holes instead. (And if you find yourself using it a lot, consider investing in a metal version. They’re cheap but handy!)
Caulk Rocket: Silly in its simplicity, but useful nonetheless :)
Rattle Can Handle: If you have a lot of spraying to do, this can be more comfortable for your hands.
Tape Dispenser: Normally these are $20+, so a printable version is useful for saving money--especially if you have a variety of tapes.
Cutting
.5″ EVA Foam Bevel Cutter: Simple yet effective way to get the perfect 45, 60, and 90 degree cuts in 1/2″ EVA foam.
6mm EVA Foam Bevel Cutter: Similar to the above concept, but for 6mm foam. Alas, only cuts at a 45 degree angle.
Tape Cutter: Useful for your spools of painter’s tape :)
Circle Cutter: Much easier than trying to freehand trace a circle with an X-acto
Sewing
Sewing Machine Phone Stand: This is meant to work with the Janome Memory Craft 6500, but has other options included. What a great idea!!
Phaff Beading Foot: If you have a Phaff machine, you’re in luck! No need to buy the beading foot.
Seam Allowance tool: A somewhat faster way of marking seam allowance than the traditional rulers. This design would be better suited for laser cutting, but it can be easily 3D printed.
Sewing Ruler Case: Keep your sewing ruler under control while in storage.
Parametric Crochet Hook: No more running to the sewing store for yet another hook! The rough nature of 3D printed objects might make this less ideal than an injection molded equivalent, but it’s not a bad idea!
Misc
Printer Calibration Test: Use this to test the limits of your 3D printer. It’s helpful for designing parts and placing supports.
Tolerance Test: Designed by the lovely Maker’s Muse, this will help you design print-in-place moving parts.
Paper Backdrop Holder: Anyone who needs to regularly photograph objects knows that setting up a nice area for shooting can be a hassle. Use this holder with rolls of paper to make a quick photo set and tear down just as easily.
Dremel Router Attachment: Why buy the part when you can print it instead?
Dremel Precision Handle: Get better control over your rotary tool while keeping your fingers safe.
382 notes
·
View notes
Link
Thinking of making a big-ticket purchase off Amazon? Use CamelCamelCamel.com to see if the item has a good price at the moment :D I was shopping around for 3d printers in December and considered the CR-10 as a potential choice. Budget was an important consideration of mine, so I checked the price history on camelcamelcamel. As you can see in the screenshot, mid-late December was not a good time to make the purchase. While I did not end up buying that model, this website helped me decide by revealing that the price would likely lower in the future. Now the printer is about $440 instead of $520--an $80 difference!

7 notes
·
View notes
Text
Hi all you new followers <3 <3
Just a heads up, I also have a Twitter account where I post more regularly. All of the meaningful content will eventually make its way to Tumblr, but I can be more chatty on Twitter :3
0 notes
Link
Heads up, Fabric.com has some great beginner articles and accompanying videos on basic sewing techniques. They cover all the terminology you need for getting started and links to products you might need (of course :P)
66 notes
·
View notes
Text
Flexible Paint Test
I need to do some detailing on S76′s boots, but boots are meant for walking go on feet. Feet bend, flex, run into stuff, and are generally rough on shoes. Hence whatever I use needs to be durable AND flexible. It’s not worth ordering another can of Plastidip, so I want to make my own flexible paint. A quick Google search reveals a couple strategies such as mixing acrylic paint with various substances. Since I have the materials on hand, I tried mixing paint with PVA glue to get a colorful substance capable of flexing without crazing or cracking. Read on to see the results!
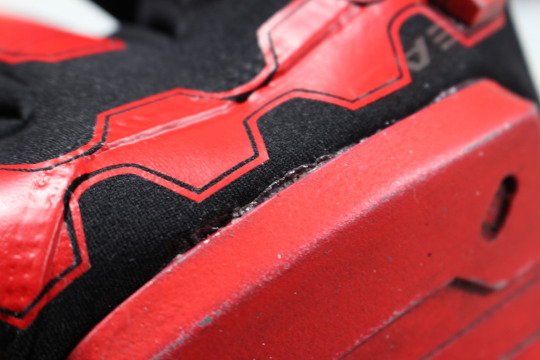
The problem:

These shoes show exactly what I’m trying to avoid: paint that has cracked and flaked due to the object (mid soles, in this case) flexing, stretching, and compressing over time. If Nike can’t avoid this problem on a $200 pair of shoes, then I certainly don’t expect to solve it with cheap craft items but that won’t stop me from trying! (Image taken from this video; also check out their store for legitimate shoe paint).
The Experiment:

Subjects of today’s experiment include two brands of PVA glue and two brands of paint: Elmer’s Glue All, Mod Podge, DecoArt Americana Paint and M. Graham heavy body Artist Acrylic.There are several important differences in these products:
Mod Podge vs. Elmer’s GlueAll: Mod Podge isn’t just PVA glue; it’s a product meant for decoupage and has additives that enhance its properties when working with paper. It is stronger than standard school glue and will last many years longer without yellowing, cracking, or failing. Elmer’s GlueAll is the grown up version of the classic kids product. According to their site, the main difference is that GlueAll is not washable when fully dried, plus it is stronger. GlueAll is a less specialized option than Mod Podge.
DecoArt Acrylics vs. M. Graham Acrylics: These guys are even more different from one another than the glues. DecoArt paints are affordable, widely available, and popular among crafters because they come in so many colors. It’s easy to walk into any craft store and grab all the hues you need, no mixing required. They are a watery acrylic with a flat, matte finish and are easy to apply. By comparison, M. Graham acrylics are targeted at painters. Buttery thick and highly pigmented, they come in a smaller range of shades because they are meant to be mixed while the artist is painting. Since I used to paint, I am partial to artists acrylics (specifically this brand) but I’ll admit they can be more trouble than they’re worth for cosplay. Artist acrylics tend to be expensive and some of the pigments are toxic (cadmium, anyone?), but high quality sure is nice. We’ll find out if it’s worth the extra $$
Various combinations of these products were applied directly to EVA foam and tested across 5 categories:
Coats to full coverage
How well they performed with masking
Texture
Convex bending
Concave bending
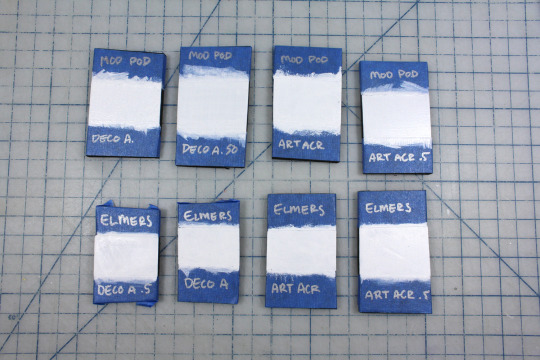
Each glue was combined with each paint, then then the combinations were tested straight and diluted 50% with water. Confused yet? Here are the samples:
Mod Podge + DecoArt
Mod Podge + DecoArt + Water
Mod Podge + Artist Acrylic
Mod Podge + Artist Acrylic + Water
Elmers + DecoArt
Elmers + DecoArt + Water
Elmers + Artist Acrylic
Elmers + Artist Acrylic + Water
1. Coats to Full Coverage
The paint/glue mixture was applied directly to black EVA foam. I’m sure it would have taken fewer coats if the foam was sealed first, but oh well. Shown here are the Mod Podge samples because I derped up and don’t have good photos of the Elmers. Thankfully both sets of glue looked identical, so these photos are still relevant. From left to right we have: DecoArt, DecoArt + water, Artist Acrylic, and Artist Acrylic + Water.


As you can see, the watered down paints took more coats to achieve the same level of opacity. Each sample has some unique texture although it is not visible from afar. In terms of application, Elmer’s + Paint was easier to mix and apply plus it took fewer coats. For some reason the Artist Acrylic got kind of chunky when mixed with Mod Podge, but it seemed to brush on acceptably. For the fewest number of coats, I would recommend a 50/50 mix of Artist Acrylics and Elmer’s Glue.
2. Masking
Man, pulling off that tape was so satisfying :P Most samples performed fine, but watered down Mod Podge bled under its masking tape. In this test, Elmer’s was definitely the superior product. Between the paints, DecoArt is more powdery when dry whereas Artist Acrylics are more rubbery. This means DecoArt gives a slightly cleaner result as masks are removed. (btw, those numbers are how many coats were needed to cover the foam).

Here you can see the most offending sample: Mod Podge + DecoArt + Water

DecoArt and Elmers glue had the cleanest result, but just barely.

3. Texture
The reason I love spray painting so much is that brush strokes drive me nuts when they’re unintentional. Hence my goal was to get the smoothest results possible. I was hoping a foam brush would help, but unfortunately it just left bubbles in my paint job. Elmer’s glue was markedly more smooth than Mod Podge. While highly pigmented Artist Acrylics had better coverage, their thick consistency left brush strokes galore.
Here you can see the result of undiluted Mod Podge and Artist Acrylic, the thickest mixture of all:

By comparison, check out undiluted DecoArt and Elmer’s glue:

4. Convex Bending
And now for the important part! Each sample was bent past a 90 degree angle several times. This would make any normal paint crack upon expanding and/or crinkle when flattened. Amazingly, every sample performed well except for two: DecoArt combined with Elmer’s glue. Look at diluted Mod Podge and Artist Acrylic bending like a champ:

And here is DecoArt + Elmer’s + Water failing on the first bend:

In the end, I think Artist Acrylic’s rubbery nature helped it bend better.
5. Concave Bending
Unfortunately, all of the samples struggled here. As the foam was folded in half, the paint was compressed into wrinkles that remained even after the piece was flattened. The test revealed three clear factors that contributed to bad wrinkles:
Elmer’s fared worse than Mod Podge
DecoArt is not really a flexible paint, so it had worse results
Diluted paints had much larger wrinkles.
With that in mind, take a look at the sample that had the three worst options: DecoArt + Mod Podge + Water

Yuck! Now look at the result of the best products: Mod Podge and Artist Acrylic:

Somehow you can hardly see the wrinkling even after bending the piece multiple times.
Final Thoughts
In the end, I chose to go with the result that seemed most resilient against wrinkling: Mod Podge mixed with Artist’s acrylic paint. I will need to take a little more care with masking and work around the brush texture, but thankfully those sort of details will not be distracting on boots. Besides, S76′s shoes are beat up and scuffed, so heavy weathering will hide flaws in the paint job.
241 notes
·
View notes
Text
Update on where I have been
So it’s been a couple weeks since I have been able to post. I was put in charge of a small project at work that has kept me quite busy (essentially I get to send 293847293874 emails a day and schedule a bunch of meetings) PLUS I am volunteering at my local library to teach some drawing classes. The classes ended up being much lighter of a commitment than anticipated due to some cancellations and icy winter weather, but they have still been something of a time sink. It takes a long time to get those classes prepped x.x Anyway, I should be back on the cosplay wagon around early-mid March, and the adventures of S76 shall continue!
2 notes
·
View notes
Text
No heat gun for EVA foam? No problem!
Just use an iron :D I needed to flatten a roll of 6 mm EVA foam, and an iron set to low did the trick nicely. Set to medium, it warmed the foam enough for shaping. Set to high, it heat sealed the surface very quickly. This trick only works for flat pieces, but it still might come in handy!
Oh, and you should use a sheet of parchment paper to keep the iron and foam from coming into direct contact with one another.

73 notes
·
View notes
Text
Holiday Update
Hey all,
Work is about to metaphorically punch me in the face with busy-ness, so that on top of the holidays means cosplay will be put on a short hold. I hope to resume normal progress in mid-February and I will try to upload some small projects between now and then. In the meantime, my ask box is always open! Feel free to drop me a question :3
-Becky

1 note
·
View note
Photo

Boots are progressing~~~
3 notes
·
View notes
Link

I’m not sure how well it would take heat forming, but if you’re making a large wooden prop I imagine it could save some painting! Granted, it looks like flooring, but maybe it will be useful to someone. Floor mats also come in fantastical color options so if your paint job gets scratched, you can choose to reveal colors other than grey.
8 notes
·
View notes
Text
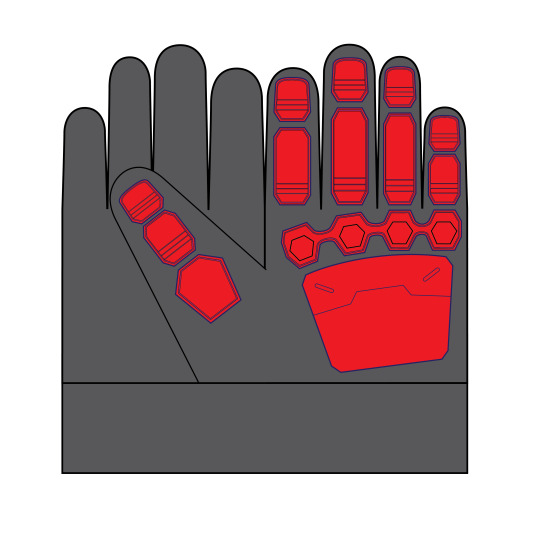
Making Soldier 76′s Gloves: A Tutorial

Yay gloves! This is a walk-through that shows how I made them. I did make several mistakes along the way, but hopefully there is still value to be found in the process. Enjoy!
Warning: Ridiculously image heavy!!
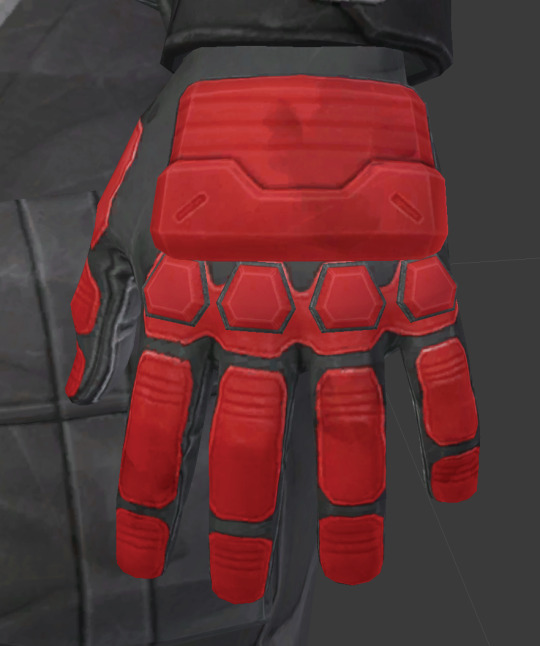
As usual, I started by hoarding references. The 3D model I downloaded was very helpful for this.

Several months ago at the beginning of this adventure, I sat down and planned how all the costume components would be built. At the time I intended to use spray adhesive to tack down some type of stretchy, plastic-y fabric--probably vinyl. Later I learned that my library’s makerspace had a die cutter, so “stretch vinyl” was replaced with heat transfer vinyl. I did choose to omit the grey palm, but otherwise these are accurate to the game model.

The pre-existing gloves were a pair of these from Costco. In hind sight, they weren’t 100% ideal; see that seam across the knuckles? It’s going to cause trouble later.

Next I needed to make a digital cut file for the Silhouette die cutter. Die cutters are basically digital cutting machines... sort of like printing with a knife. You give them a file with lines, and a knife (or other tool) traces them onto materials like paper, fabric, and vinyl. The software requires vectors to cut, so I used Adobe Illustrator. If you don’t have access to this software, the open source equivalent Inkscape would work just as well. I began by very carefully measuring the gloves to make a janky but correctly scaled pattern. The red armor was drawn over the top.
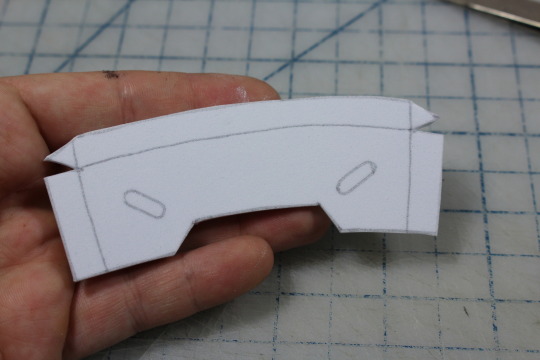
Next, the templates were printed and laid over the glove to check for scale. as you can see, the guard on top of the hand is much too large. I made a few adjustments to the paper templates, scanned them, and modified the vectors to fit.

Then it was cutting time! Only the finger and knuckle guard bases were made from heat transfer vinyl. (If I didn’t have access to the die cutter, I would have traced the templates onto masking tape and used them as a mask for fabric paint.)

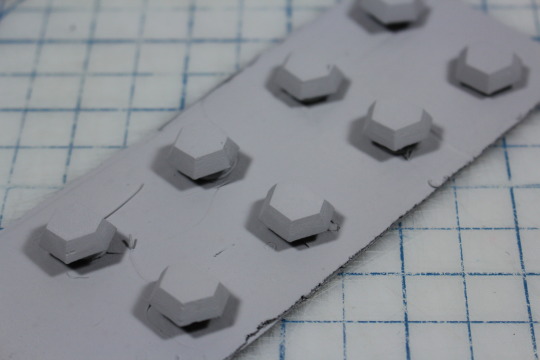
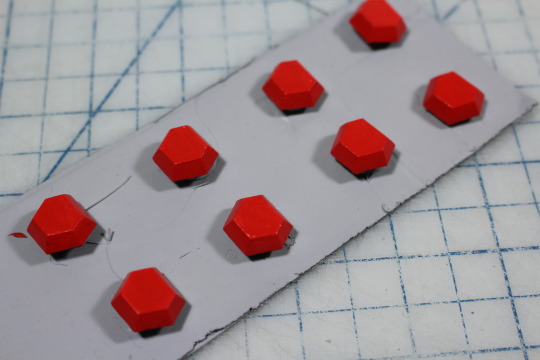
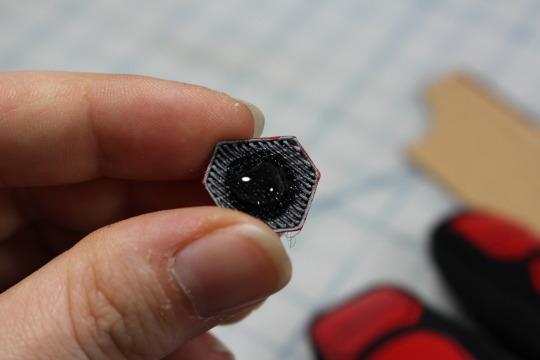
Next I wanted to make the knuckle guards. These could have easily been made with Sculpey, but I sit next to a 3D printer all day at work so I took the easy way out.
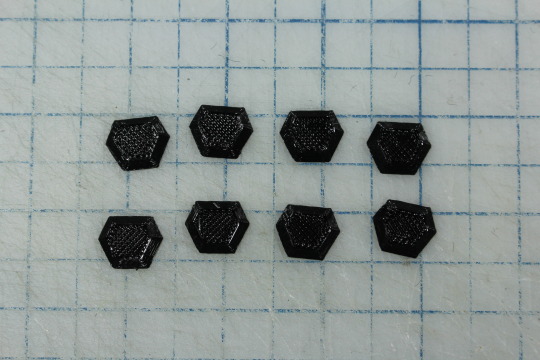
As normal with 3D prints, these had a distinct texture. I decided to take the opportunity and try out Automotive Filler Primer since it’s supposed to be the bee’s knees for smoothing 3D prints. Sanding PLA sucks, so I’ll jump on any possible opportunity to avoid it. In preparation for spray painting, the knuckle guards were stuck on a piece of cardboard with hot glue. A little clearance from the surface means their edges will be more clean, plus I don’t need to keep track of 8 tiny pieces of plastic. The hot glue will peel off cleanly later.
From what I had heard, you don’t need to sand filler primer because it self-levels. After one coat, I was not so sure.

Three coats in and the ridges were actually more pronounced, so I broke out the sandpaper.

Amazing!!! It looks awful but dang did it feel smooth and it sanded SO MUCH EASIER than PLA! 220 grit paper was plenty remove material.
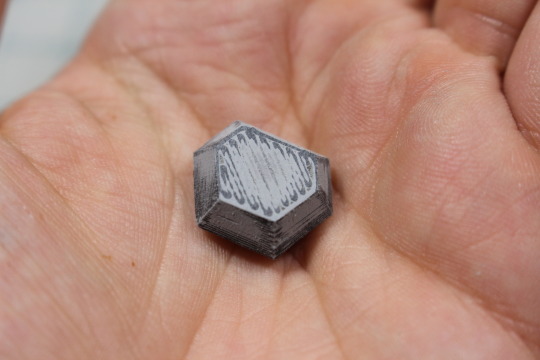
After two more passes of spraying and sanding, the guards were looking pretty smooth. Here they are after their final spray:
Fun fact, that stuff will clog up your paper something fierce! Buy a lot of sandpaper if you have large things to surface.
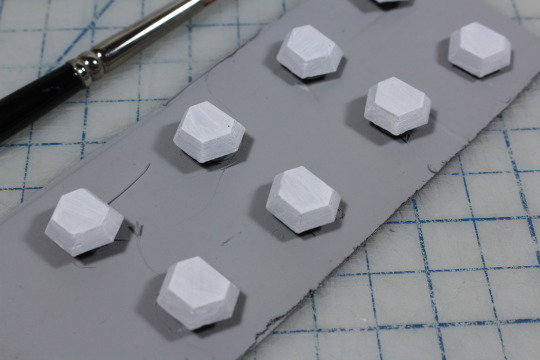
Next up was painting. Normally I would spray paint or airbrush something like this, but the weather has not been cooperating lately so I hand-painted them instead.
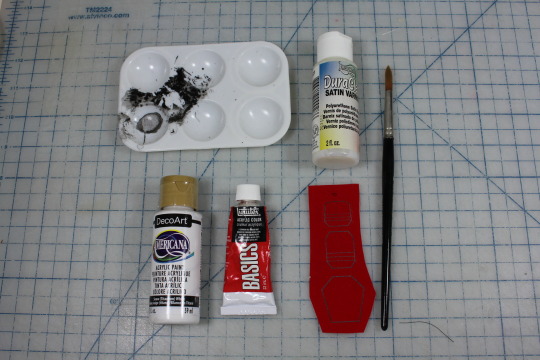
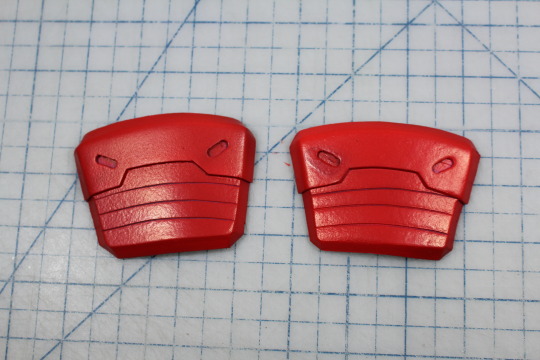
Since the red paint is somewhat translucent, I gave the parts a thin coating of white first. Then red was layered on until I achieved full coverage.
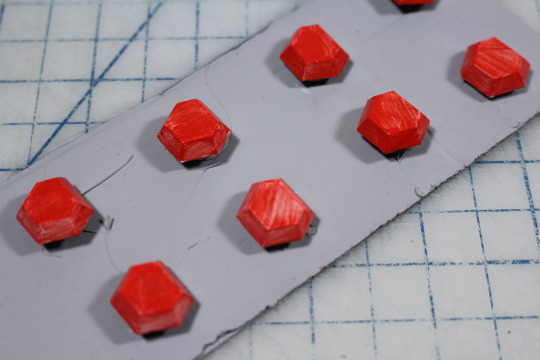
The final detail for the knuckle guards was a thin, black line running around their base. Any permanent marker will do.

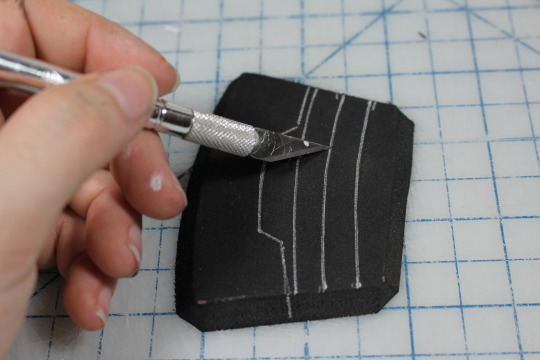
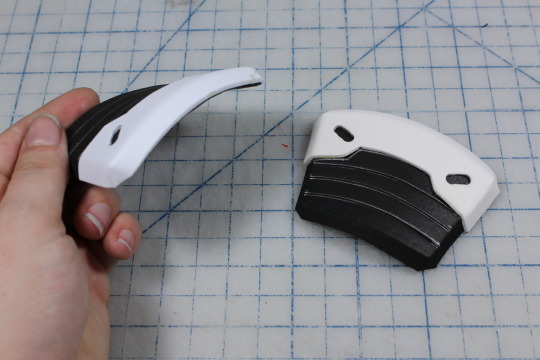
The knuckle guards still need weathering, but I prefer to weather everything at once so I moved on to building the hand guards. Using the paper template from Illustrator, I traced the main shape onto 6mm foam. You will notice some indents running along the flat surface:
Those were recreated by scoring the foam with an X-acto knife. When blasted with a heat gun, the foam will contract slightly to create a groove (pictures of this later).
I added a second layer to the guards with 2mm craft foam.
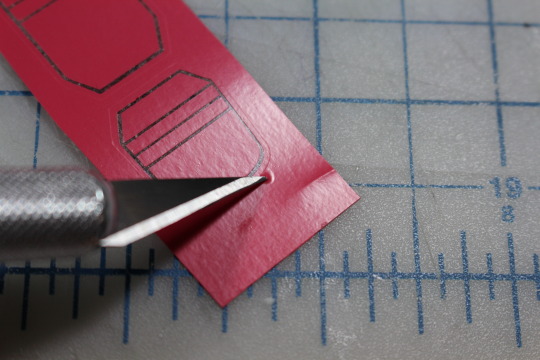
In order to emphasize the angles, I carved a teeny grove with my pen knife and removed the excess material with a pair of tweezers.


This channel helps the foam bend a little sharper. It might seem subtle, but the effect was worth it.

Next, I used a sharpened aluminum tube to punch perfect circles into the foam. You can find these at most hobby stores and sharpen them with a needle file--also to be found at most hobby stores. The holes were expanded into slots using my handy X-acto. This was surprisingly hard to do neatly; I wish EVA foam was a little more dense :/

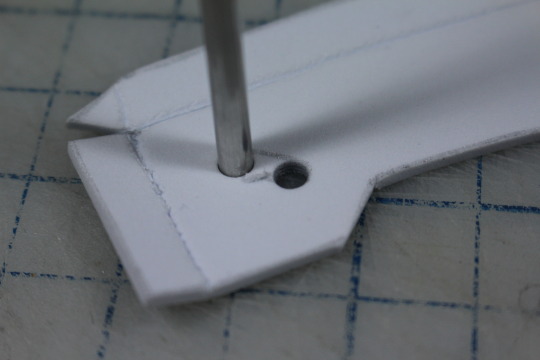
The parts were adhered together with contact cement. I had to do this outside and it was dark, so I don’t have good pictures :( As a last step before painting, I used a heat gun to give them a gentle curve and emphasize those grooves. Unfortunately, I was a little liberal with the heat and you can see some low-key melting. Oops. Given the size of these parts, it was an interesting challenge to attempt without gloves.
For painting, I decided to use my airbrush. I was gifted a setup yeeeeeeeears ago and I hardly ever use it. Time to change that! I primed the foam with this all-purpose primer which claimed to be slightly flexible. This is a lie. Don’t buy this brand of primer if you need something to be flexible!!
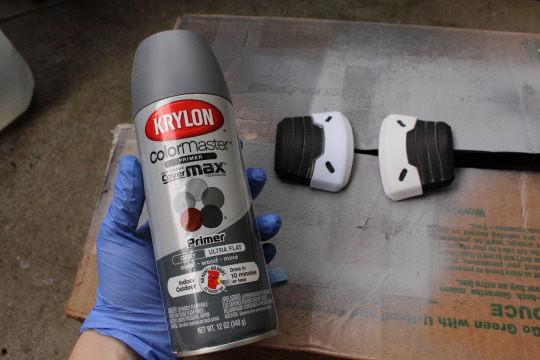
Like the knuckle guards, I gave the hand guards a light pass with white so it would take less red to reach full coverage. Full disclosure, I kind of suck with air-brushes. See that weirdo blob on the left corner of the left guard? That’s what happens when you spray too much paint with an air-brush. They also had a funky texture which I believe was a result of too much paint at once.
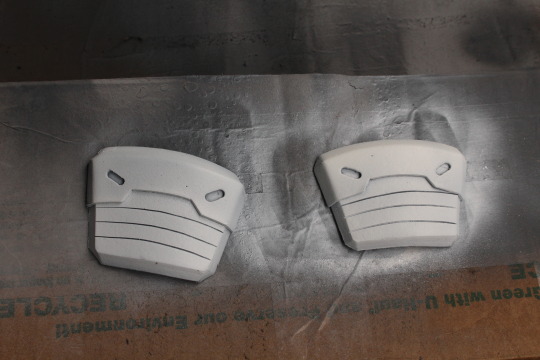

For weathering, I used 400 grit sandpaper to remove paint from corners and edges revealing the primer beneath. I think it gives a pretty neat effect! Grime was a mixture of Mars Black, Burnt Umber, and water. Finally, a coat of brush-on varnish sealed the paint job.


It was only after applying the varnish that I realized it was glossy, so I misted the parts with Matte Fixative meant for sealing drawings. This is not ideal and you should be smarter than me and buy the right varnish to begin with.
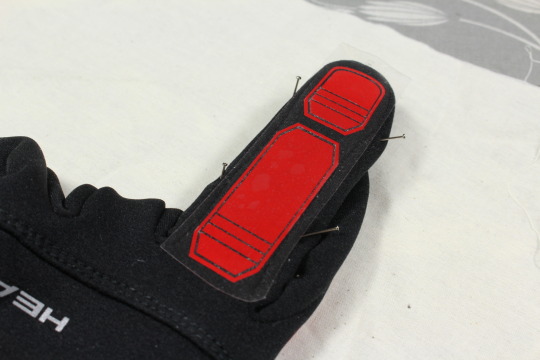
Finally, it was time to add the finger pieces and assemble the gloves! This was done with an ancient (circa 1970′s) iron, a scrap of muslin, some cardboard, and sewing pins.

Note about the vinyl: There is such a thing as stretchy heat transfer vinyl. I didn’t know this when purchasing, but stretchy would definitely have been preferable. The fingers of a glove are constantly flexing and moving, so over time my regular vinyl will break down. I did verify that my pattern would stretch, but you should still purchase the proper variety if you choose to do something like this. Thankfully the pattern I cut allowed the material to stretch somewhat.

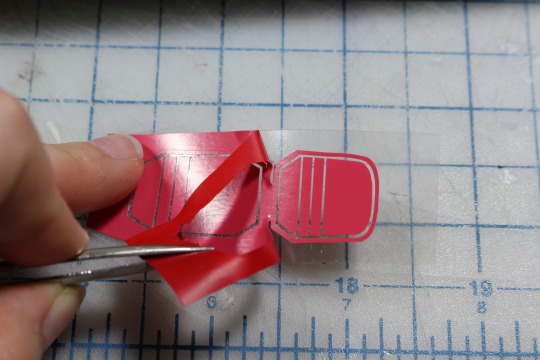
Once cut, the vinyl needed weeding. Weeding is the process of removing everything you don’t need from the piece to be transferred. While there are specific tools available for this task, I like using an X-acto knife. After you get a piece started, tweezers can help remove the rest. Be very careful during this step; sometimes the machine doesn’t quite slice all the way through and you can pull off the wrong parts.
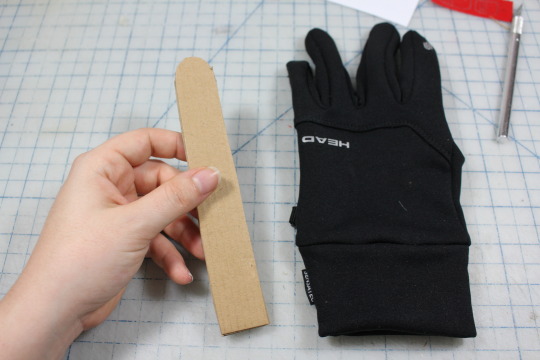
With the parts weeded, it was time to iron them in place. Heat transfer vinyl needs to be pressed while perfectly flat. The fingers of these gloves have gussets on each side which equals a lot of fabric and seams in a small area. Such construction makes them form-fitting and comfortable, but I couldn't get them to lay flat. To remedy this I made an insertable cardboard finger and pinned the fabric in place. It was important NOT to stretch the fabric while doing so or else the vinyl would crumple when un-pinned.


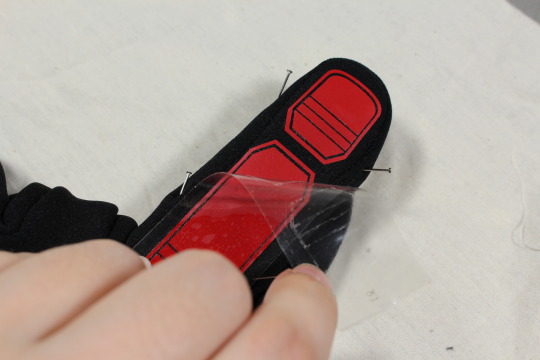
With the fabric secured, I attempted to stick the vinyl in place using the mildly adhesive cover plastic. Alas, it just wouldn’t stay, so I used a snugly pinned piece of muslin to hold it down. 15 seconds of pressing with the iron, and ta-dah! Red decals :)


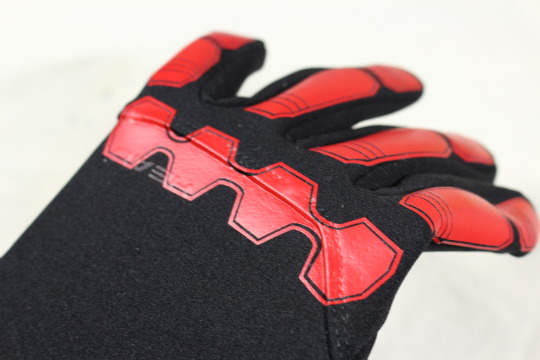
These gloves are two sizes too big for me in case you couldn’t tell :)
Remember how I mentioned that seam across the back causing trouble? Unfortunately it runs right through the middle of a decal. It was very tricky to iron without burning the vinyl and it’s kind of ugly. 10-foot rule will save me, but it could have been avoided by buying better gloves.
The last step was gluing the hand and knuckle guards in place. Because the fabric is stretchy but my parts are curved, I needed to put the gloves on Casey before gluing down anything rigid. Alas, I don’t have many images here because Casey didn’t feel like being a hand model and we were outside because of glue fumes. Each hand guard got a thorough application of E6000 in the center with hot glue around the edges. I wanted the strength of E6000 but needed the quick dry time of hot glue, so this worked fairly well. Overflowed hotglue was colored with a Sharpie and disappears from a distance.

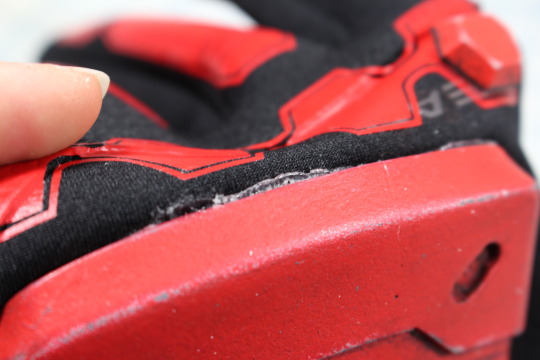
More E6000 was used to fix the knuckle guards. Then the gloves were tossed into the Bin of Shame ™ to cure without fumigating my room.

After two days of curing, everything was finished! I'm really happy with how they turned out :D

98 notes
·
View notes
Photo


Gloves are done! w00t!! It feels great to have one component finished even it if is the most simple part of this entire build. There are a couple issues that will affect longevity, but they should survive a few cons intact :)
Complete guide to making these can be found here!
29 notes
·
View notes
Photo


Gloves in progress! Currently stuck waiting for spray painting weather, but then these will be quick to finish! What you see are some hand painted, 3D printed knuckle guards, unpainted EVA foam bits of armor, and die cut, iron-on vinyl decals for the fingers. So close to finishing these things!!
Also note the quality difference in the last photo; this is why I don’t normally shoot stuff with my smart phone :x
Psst! The gloves are now complete so you can check out the full write up here!
31 notes
·
View notes
Photo


Daylight savings in the winter plus gloomy skies mean that it’s dark by the time I get home. Alas, that makes spray painting things nearly impossible--especially when those things are black. Since I’m stuck waiting for daylight and dry skies to paint, have some screenies nabbed from the game and S76′s cinematic. Fun things I learned while capturing these:
Soldier 76 can jump more than double his height
Soldier 76 can run directly at gunfire from a gatling gun and at least 4 machine guns without getting hit
Soldier 76 can be within 15 feet of a grenade explosion and escape with nothing but a sore rib.
Soldier 76 does not like piñatas
Whoever directed this animation sure loves motion blur
132 notes
·
View notes
Photo


Introducing Diego the Mii Fighter!
First photo by Jason Smith.
This cosplay was a collaboration between myself and SillyEwe! I only built the head and they handled the rest. This debuted at Kumoricon 2017 in Portland where SillyEwe repped the underrated Mii Fighters from Super Smash Bros 4. Diego is a personal character of theirs going back many years, so it was great to see one of his many incarnations come to life!
The head is made of EVA and upholstery foam covered with wool felt and fleece. His eyes are perforated plastic allowing for airflow and vision, and a second port is hidden on top of his head. A computer fan assists with ventilation. SillyEwe built the outfit out of found clothing items and painted EVA foam. The costume was a smash hit (pun intended!) and we have another collaboration planned for next year.
#Mii Fighter#super smash brawl#super smash bros#Mii#Diego#cosplay#kumoricon#2017#collaboration#convention
38 notes
·
View notes
Text
When working out is a bad thing
So I have finally surpassed the 3D printing issues for the near future meaning I can move forward with the boots! In fact, they are completely masked and ready for painting tomorrow morning. This means I am mere days away from being done! Unfortunately I have run into yet another surprise issue.
Casey and I have both been trying to make our lifestyles more healthy, and part of this has included exercising along with eating better. Alas, the exercise has been TOO effective because Casey’s calves have grown so much that the boots barely fit anymore T.T Whyyyyyyyyyyyyyyyyyyyyyyyyyyyyyyyyyyyyyyy

Casey is a fairly muscular person (being a man and all), but I made the tape dummy of his foot two months ago. I didn’t know calf muscles would bulk that quickly?
I think I can salvage the boots by rebuilding a few key parts, but if I can’t... there’s going to be a snazzy pair of Soldier 76 boots for sale in the near future.
2 notes
·
View notes