
breadbythehour
Bread By the Hour
omnomnom
176 posts
Last active 60 minutes ago
Don't wanna be here? Send us removal request.
Last Seen Blogs

largando
Untitled

azmamusic
Southside Tokyo
largando
Untitled

pookiehao
lili

valley-of-the-lily
🍜🍲🍜🍲🍜🍲🍜🍲🍜🍲🍜🍜🍲🍜🍲🍜
Text
5 Reasons Why Quick Bread Falls Flat

Quick breads are among the easiest bread recipes to make. Beginning bakers can turn to these speedy loaves time and time again whenever they want bread without waiting around for dough to rise.
But quick breads can also be finicky.
To help you out, I’ve assembled the most common reasons your bread doesn’t rise as well as it should.
1. Over Mixing
Traditional yeasted and sourdough loaves require some gluten development to ensure the bread holds together while baking. Some recipes recommend stretch and folding techniques while others work best with thorough kneading. It’s only natural to assume that quick breads should be thoroughly mixed until smooth.
However, 9 times out of 10, my quick bread falls flat because I over mixed the batter.
As a general rule, you should only mix quick breads just enough to moisten the ingredients. A few lumps are okay! Over mixing a quick bread causes too much gluten to develop, resulting in strands that trap hot air. When the bread cools, the hot air escapes and the loaf collapses.
2. Expired Leavening
Many bakers love quick bread recipes because they’re fast and easy to make. Rather than relying on yeast or sourdough cultures to give the bread lift, quick bread recipes use baking powder or baking soda (or a combination of the two). Both leavening agents react with ingredients in the bread to create gas, and that gas causes the bread to rise quickly in the oven.
Baking soda and baking powder are fairly shelf stable. On average, an unopened container of baking soda or powder can last as long as 18 months at room temperature. Once opened, they have a shelf life of 6 months to 1 year.
However, just because baking soda and baking powder last a long time doesn’t mean that the container in your pantry is strong enough to bake bread. If you find your quick bread falls flat, check your leavening for effectiveness. Sprinkle a little baking soda or baking powder in some vinegar. If it fizzes, it’s safe to use. Replace them if you don’t see bubbles.
3. Too Much Liquid
Quick bread batter has a much higher hydration than your typical kneaded loaf. Consequently, you can’t expect the batter to hold its shape without a bread pan. Many quick breads also incorporate ingredients like zucchini, carrots, or pumpkin that increase the moisture content. These mix-ins give your bread a a soft, tender crumb.
But you can have too much of a good thing whenever you bake.
If your quick bread falls flat, take a closer look at your batter. If the batter runs off the spoon, it likely doesn’t have enough dry ingredients to compensate for the wet ones. Before mixing, be sure to dab excess moisture from fruits and veggies with a paper towel or allow them to drain with a sieve. Whenever possible, measure ingredients by weight rather than volume to ensure the proper ratios.
Want the Rest?
These are just 3 of the 5 most common mistakes. If you want to read the rest of this post, stop by breadbythehour.com and check out my 5 Reasons Quick Bread Falls Flat Post.
0 notes
Text
Sourdough Discard Carrot Cake Bread

Check out my new Sourdough Discard Carrot Cake Bread!
For those in a rush, I’m re-posting the basic recipe here on my Tumblr. But if you want the full picture-by-picture instructions, nutritional information, and secrets to success you can go to my website.
Here’s what you’ll need…
Ingredients
Bread
150 Grams All-Purpose Flour (1 1/4)
161 Grams Brown Sugar (3/4 Cup)
2 Grams Baking Powder (1/2 Teaspoon)
4 Grams Baking Soda (1 Teaspoon)
1.5 Grams Salt (1/4 Teaspoon)
5 Grams Ground Cinnamon (2 Teaspoons)
1.2 Grams Ground Nutmeg (1/2 Teaspoon)
1 Gram Ground Ginger (1/2 Teaspoon)
0.2 Grams Cloves (1/8 Teaspoon)
226 Grams Sourdough Starter – Fed, Unfed, or Discard (1 Cup)
60 Grams Milk (1/4 Cup)
80 Grams Vegetable Oil (1/3 Cup)
8.4 Grams Vanilla Extract (2 Teaspoons)
1 Large Egg
137.5 Grams Carrots – Peeled and Grated (1 1/4 Cup)
54.5 Grams Pecans (1/2 Cup), Optional
Cream Cheese Frosting
224 Grams Cream Cheese, Softened (1 Block)
115 Grams Butter, Softened (1/2 Cup)
360 Grams Confectioners’ Sugar – Powdered Sugar (3 Cups)
1.5 Grams Salt (1/4 Teaspoon)
60 Grams Milk (1/4 Cup)
Additional Equipment
Small and Large Mixing Bowls
Wooden Mixing Spoon
Measuring Cups and Spoons
Kitchen Scale
Cambro Container with Lid
One 9-inch by 5-inch pan
Cooling Rack
Oven Mitts
Hand Mixer
Instructions
Preheat oven to 350° Fahrenheit (176° Celsius).
In a large mixing bowl, combine dry ingredients: flour, brown sugar, baking powder, baking soda, salt, ground cinnamon, nutmeg, ginger, and cloves.
In a smaller mixing bowl, combine wet ingredients: sourdough starter, milk, vanilla extract, and egg.
Stir the wet ingredients into the dry until just moistened.
Fold in the carrots and pecans.
Pour batter into lightly greased 9-inch by 5-inch bread pan.
Bake for 55 to 60 minutes. Internal temperature should read between 195 and 200° Fahrenheit (90 and 93° Celsius).
Let bread cool in pan on a wire cooling rack for 10 to 15 minutes. Use a butter knife to loosen the sides from the pan, and turn out on wire cooling rack to finish cooling.
Drizzle with Cream Cheese Frosting and enjoy.
Enjoy!
#bread#bread recipes#yummy#yummy food#tasty#tasty food#yumminess#tasty recipes#sourdough#sourdough bread#sourdough discard#sourdough discard bread#carrot cake bread#carrot bread#sourdough discard carrot cake bread#cream cheese frosting#easter bread
1 note
·
View note
Text
Cinnamon Swirl Maple Oatmeal Raisin Bread

Check out my new Cinnamon Swirl Maple Oatmeal Raisin Bread!
For those in a rush, I’m re-posting the basic recipe here on my Tumblr. But if you want the full picture-by-picture instructions, nutritional information, and secrets to success you can go to my website.
Here’s what you’ll need…
Ingredients
Bread
236 Grams Warm Water (1 Cup)
17 Grams Dry Active Yeast (1 Tablespoon)
510 Grams All-Purpose Flour (4 1/4 Cups)
42 Grams Quick Oats (1/2 Cup)
9 Grams Salt (1 1/2 Teaspoons)
1 Gram Ground Cinnamon (1/2 Teaspoon)
85 Grams Maple Syrup (1/4 Cup)
56 Grams Butter, Melted (1/4 Cup)
1 Large Egg
Cinnamon Swirl Topping
7 Grams Butter, Melted (1 1/2 Teaspoons)
12 Grams Brown Sugar (3 Teaspoons)
1.5 Grams Ground Cinnamon (3/4 Teaspoons)
50 Grams Raisins (1/4 Cup)
Oat Topping
1 Large Egg
15 Grams Water (1 Tablespoon)
10 Grams Quick Oats (2 Tablespoons)
Additional Equipment
Small and Large Mixing Bowls
Wooden Mixing Spoon
Measuring Cups and Spoons
Kitchen Scale
Cambro Container with Lid
One 9-inch by 5-inch pan
Cooling Rack
Oven Mitts
Instructions
In the bowl of a standing mixer, stir together yeast and warm water. Let rest for 10 to 15 minutes until foamy.
In a separate mixing bowl, combine the dry ingredients: flour, oats, cinnamon, and salt.
Set the standing mixer to low. Add the dry ingredients and mix with the dough hook. Gradually mix in in the wet ingredients: maple syrup, butter, and egg.
Continue mixing with the dough hook until the dough pulls away from and cleans the sides of the bowl. The dough will feel smooth and slightly tacky. If sticky, add flour a tablespoon at a time. If too dry, add water a tablespoon at a time.
Place dough in a lightly greased container. Cover and let rise until doubled and puffy, about 1 hour.
Punch down dough and shape into a rectangle. Brush with melted butter and sprinkle with cinnamon sugar and raisins.
Place in a lightly greased 9-inch by 5-inch bread pan. Cover and let rise until the dough reaches above the lip of the pan, about 30 minutes to 45 minutes.
In a small container, beat together the egg with the water to create an egg wash. Brush over the top of the dough, and sprinkle with additional oats.
Preheat the oven to 375° Fahrenheit (190° Celsius) and bake for 35 to 40 minutes.
Turn out bread onto a wire cooling rack and allow it to cool completely before slicing and serving.
Enjoy!
#bread#bread recipes#yummy#yummy food#tasty#tasty food#yumminess#tasty recipes#bake from scratch#maple oat bread#maple oatmeal raisin bread#cinnamon swirl#cinnamon swirl bread#cinnamon swirl maple oatmeal raisin bread#good food#food recipes
2 notes
·
View notes
Text
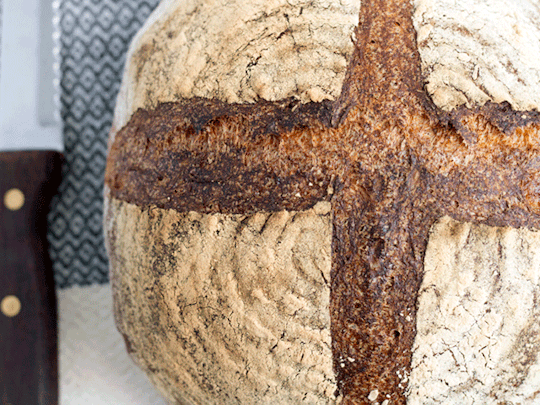
Beginner Dark Rye Sandwich Bread
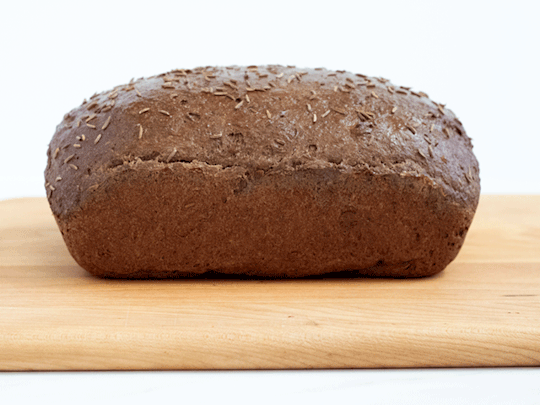
Check out my new Beginner Dark Rye Sandwich Bread Recipe!
For those in a rush, I’m re-posting the basic recipe here on my Tumblr. But if you want the full picture-by-picture instructions, nutritional information, and secrets to success you can go to my website.
Here’s what you’ll need…
Ingredients
17 Grams (1 Tablespoon) Dry Active Yeast
240 Grams (1 Cup) Warm Water
70 Grams (1/4 Cup) Molasses
150 Grams (1 1/2 Cups) Rye Flour
360 Grams (3 Cups) All-Purpose Flour or Bread Flour*
25 Grams (1/4 Cup) Dutch Cocoa Powder**
13 Grams (2 1/4 Teaspoons) Fine Sea Salt
7 Grams (1 Tablespoon) Caraway Seeds, Plus More for Sprinkling
60 Grams (1/4 Cup) Butter, Melted
1 Egg
This loaf also has an optional egg wash if you want to top it with caraway seeds:
1 Egg
1 Tablespoon Water
Additional Equipment
Standing Mixer with Dough Hook
Measuring Cups and Spoons
Kitchen Scale
Large Container with Lid
9.5-inch by 5-inch Baking Pan
Baking Brush
Wire Cooling Rack
Probe Thermometer
Oven Mitts
Instructions
In the bowl of a standing mixer, combine the warm water, molasses, and active dry yeast. Stir until all the grains dissolve. Let sit until foamy, about 10 to 15 minutes.
In a separate mixing bowl, whisk together your flours, Dutch cocoa powder, salt, and caraway seed.
With your dough hook attachment, set your mixer to low and pour in your dry ingredients. Gradually add the melted butter and egg. Mix until the dough pulls away from the sides of the bowl.
Shape your dough into a round and transfer to a lightly greased container. Cover and let your dough rise until double in size, about 1 hour to 1 1/2 hours.
Shape your dough into a sandwich loaf and transfer to a lightly greased 9-inch by 5-inch bread pan. Cover and let rise until dough is above the lip of the pan, about 45 minutes to 1 hour.
Preheat your oven to 375 degrees Fahrenheit (190 degrees Celsius).
Beat together the egg with 1 tablespoon of water to create an egg wash. Brush the egg wash mixture over the top of the bread. Sprinkle with caraway seeds.
Bake your bread for 20 minutes. Tent with aluminum foil, and then bake another 20 to 25 minutes until internal temperature reads between 195° and 200° Fahrenheit (90° and 93° Celsius). Bottom will sound hollow when thumped.
Turn out loaf onto a wire cooling rack. Let cool completely before slicing and serving.
Enjoy
#bread#bread recipes#yummy#yummy food#tasty#tasty food#yumminess#tasty recipes#bake from scratch#Rye#Rye Bread#Rye Flour#Rye Sandwich Bread#Dark Rye#Dark Rye Bread#Dark Rye Sandwich Bread
14 notes
·
View notes
Text
Baking Powder or Baking Soda in Bread

Baking soda and baking powder are essential for lifting quick breads in the oven. They give breads their fluffy, porous texture. But should you use baking powder or baking soda for your next recipe? Are they interchangeable? Let’s take a look at the difference between the two and how they affect your quick bread.
A Closer Look at Baking Soda

Baking soda is the common name for the chemical leavener sodium bicarbonate. It has a variety of uses from cleaning clothes to easing heartburn to treating bug bites. When combined with an acidic ingredient, baking soda produces a lot of carbon dioxide gas bubbles.
If you add baking soda to a quick bread, the gas bubbles it releases into the batter lifts your bread. When the combination of baking soda and acid combines with heat, proteins in the batter (like eggs) turn rigid. The rigid structure traps the gas and results in a light, fluffy texture. This reaction happens fast and weakens over time. As a result, you should only mix your baking soda into your batter right before you put your bread in the oven.
Baking soda is about 3 to 4 times stronger than baking powder, but only when combined with an acidic ingredient. Without an acid to neutralize, leftover baking soda in your bread will taste metallic and soapy. Consequently, baking soda works best in recipes that use acidic ingredients such as buttermilk, yogurt, lemon juice, cream of tartar, or vinegar.
Not sure how much baking soda to add to your recipes? As a general rule, aim for 1/4 teaspoon of baking soda for every 1 cup of flour.
A Closer Look at Baking Powder
Baking powder uses baking soda has its key ingredient. Many baking powder brands combine sodium bicarbonate with an acidic component (such as cream of tartar) and a starch component (such as cornstarch).
As with baking soda, baking powder also releases gas bubbles into your quick bread, giving it a softer, fluffier texture in the oven. But because baking powder already has an acid to react with, you don’t need to worry about including molasses, cocoa powder, applesauce, or honey to your quick bread recipe to ensure a proper rise.
Not sure how much baking soda to add to your recipes? As a general rule, aim for 1 teaspoon of baking soda for every 1 cup of flour.
What About Double-Acting Baking Powder?
In the past, stores sold two types of baking powder: single acting and double acting. However, double-acting baking powder has long since replaced single-acting products, and you won’t likely find single-acting baking powder on the shelves anymore.
Essentially, double-acting baking powder has two reactions that produce gas. The first reaction occurs whenever dry baking powder combines with a wet ingredient. To maximize the lifting that occurs during this first reaction, you need to add baking powder at the end of your mixing stage and quickly finish your bread.
The second reaction that produces gas occurs when baking powder has access to moisture and heat. Consequently, your bread will still rise in the oven even if you don’t fully capitalize on that first reaction.
Can You Substitute One for the Other?

If you’ve run out of baking powder or baking soda, you could potentially substitute one for the other. However, they are not equal in strength or behave exactly the same, so you’ll have to exercise a bit of caution. Do not assume they are interchangeable.
Using Baking Powder Instead of Baking Soda?
For every teaspoon of baking soda in a recipe, triple the amount of baking powder you use.
1 Teaspoon of Baking Soda = 1 Tablespoon Baking Powder.
And because baking powder has quite a bit of sodium, you’ll need to cut the salt in your recipe by half.
Using Baking Soda Instead of Baking Powder?
You can make your own baking powder if you have baking soda, cream of tartar, and cornstarch.
1 Teaspoon Baking Powder = 1/4 Teaspoon Baking Soda + 1/2 Teaspoon Cream of Tartar + 1/4 Teaspoon Cornstarch
Don’t have cream of tartar? You can still make a baking powder substitute so long as you have an acidic ingredient.
1 Teaspoon Baking Powder = 1/4 Teaspoon Baking Soda +1 Teaspoon White Vinegar (or 1 Teaspoon of Lemon Juice)
Keep in mind that white vinegar or lemon juice can affect the flavor of your food, so you may need an extra tablespoon or two of sugar to compensate.
Want to Learn More?
This post only covers part of what I shared on BreadbytheHour.com. If you want to learn about when to use just baking soda or just baking powder, or if you want to know whether to mix these ingredients with yeast, stop by and read my latest post "Baking Powder or Baking Soda in Bread."
#bread#bread recipes#bake from scratch#baking soda#baking powder#baking soda or baking powder#leaveners#helpful baking tips
7 notes
·
View notes
Text
Savory Sourdough Discard Quick Bread

Check out my new Savory Sourdough Discard Quick Bread recipe!
For those in a rush, I’m re-posting the basic recipe here on my Tumblr. But if you want the full picture-by-picture instructions, nutritional information, and secrets to success you can go to my website.
Here’s what you’ll need…
Ingredients
240 Grams All-Purpose Flour (2 Cups)
12.5 Grams White Granulated Sugar (1 Tablespoon)
5 Grams Baking Powder (1 Teaspoon)
1.5 Grams Baking Soda (1/4 Teaspoon)
9 Grams Salt (1 1/2 Teaspoons)
226 Grams Sourdough Starter - Fed, Unfed, or Discard (1 Cup)
120 Grams Melted Butter (1/2 Cup)
180 Grams Milk (3/4 Cup)
1 Large Egg
Additional Equipment
Mixing Bowls, Cups, Spoons
Kitchen Scale
9-Inch by 5-Inch Baking Pan
Wire Cooling Rack
Oven Mitts
Probe Thermometer
Instructions
Preheat oven to 350° Fahrenheit (176° Celsius).
In a medium mixing bowl, whisk dry ingredients together: flour, sugar, baking powder, and salt.
In a smaller bowl, stir to combine wet ingredients: sourdough starter, butter, milk, and egg.
Pour the wet ingredients into the dry. Stir until well incorporated but do not over mix.
Spoon batter into a 9-inch by 5-inch baking pan lightly greased and lined with parchment paper.
Bake for 1 hour. Internal temperature should read between 195° and 200° Fahrenheit (90° and 93° Celsius).
Transfer to a wire cooling rack and let cool for 10 minutes before slicing and serving warm.
Enjoy!
#bread#bread recipes#yummy#yummy food#tasty#tasty food#yumminess#tasty recipes#bake from scratch#sourdough#sourdough bread#sourdough discard#sourdough starter#sourdough discard bread#quick bread#fast bread#sourdough discard quick bread#savory#savory bread#savory quick bread#savory sourdough discard quick bread
1 note
·
View note
Text
Cinnamon Raisin Applesauce Bread

Check out my new Cinnamon Raisin Applesauce Bread!
For those in a rush, I’m re-posting the basic recipe here on my Tumblr. But if you want the full picture-by-picture instructions, nutritional information, and secrets to success you can go to my website.
Here’s what you’ll need…
Ingredients
Bread
250 Grams Applesauce (1 Cup)
66 Grams White Granulated Sugar (1/3 Cup)
66 Grams Brown Sugar, Packed (1/3 Cup)
40 Grams Vegetable Oil (3 Tablespoons)
30 Grams Milk (2 Tablespoons)
2 Grams Vanilla Extract (1/2 Teaspoon)
1 Large Egg
180 Grams All-Purpose Flour (1 1/2 Cups)
4 Grams Baking Soda (3/4 Teaspoon)
1 Grams Baking Powder (1/4 Teaspoon)
4 Grams Apple Pie Spice (1 1/2 Teaspoons)
1.5 Grams Salt (1/4 Teaspoon)
31 Grams Pecans, Chopped (1/4 Cup)
50 Grams Raisins (1/4 Cup)
Cinnamon Sugar Topping
12 Grams White Granulated Sugar (1 Tablespoon)
1 Gram Ground Cinnamon (1/2 Teaspoon)
Apple Pie Spice Substitute (Don't Use All)
8 Grams Ground Cinnamon (4 Tablespoons)
3.5 Grams Ground Nutmeg (1 1/2 Teaspoons)
3 Grams Ground Cardamom (1 1/2 Teaspoons)
2 Grams Ground Ginger (1 Teaspoon)
1 Gram Ground Allspice (1/2 Teaspoon)
Additional Equipment
Mixing Bowls, Cups, Spoons
Kitchen Scale
9-Inch by 5-Inch Baking Pan
Wire Cooling Rack
Oven Mitts
Probe Thermometer
Instructions
Preheat oven to 350° Fahrenheit (176° Celsius).
Combine your applesauce, white sugar, brown sugar, vegetable oil, milk, vanilla extract, and eggs in a large mixing bowl.
Whisk the flour, baking soda, baking powder, apple pie spice, and salt in a smaller mixing bowl.
Gradually stir in the dry ingredients to the wet ingredients to form a thick batter.
Fold in the chopped pecans and raisins.
Pour your batter into a lightly greased and lined with parchment 9-inch by 5-inch baking pan.
Sprinkle cinnamon sugar topping over the top.
Bake for 1 hour or until internal temperature reads between 195° and 200° Fahrenheit (90° and 93° Celsius).
Transfer loaf to a wire cooling rack and allow it to cool completely before slicing and serving.
Enjoy!
#bread recipes#bread#yummy#yummy food#tasty#tasty food#yumminess#tasty recipes#bake from scratch#Quick Bread#Dessert Bread#Applesauce Bread#Cinnamon Raisin Bread#Cinnamon Raisin Applesauce Bread#Breakfast Bread#Dessert Loaf
9 notes
·
View notes
Text
Simple Honey Oat Sandwich Bread
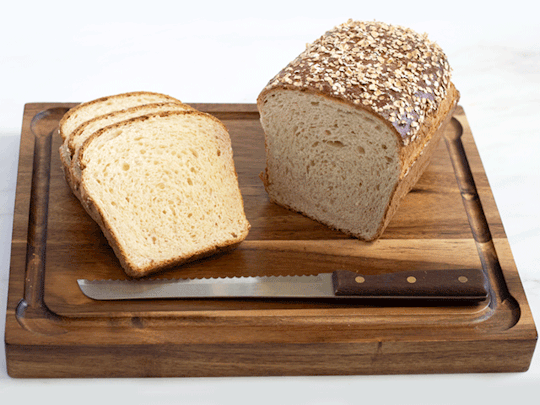
Check out my new Simple Honey Oat Sandwich Bread Recipe!
For those in a rush, I’m re-posting the basic recipe here on my Tumblr. But if you want the full picture-by-picture instructions, nutritional information, and secrets to success you can go to my website.
Here’s what you’ll need…
Ingredients
Bread
236 Grams Warm Water (1 Cup)
17 Grams Dry Active Yeast (1 Tablespoon)
510 Grams All-Purpose Flour (4 1/4 Cups)
42 Grams Quick Oats (1/2 Cup)
9 Grams Salt (1 1/2 Teaspoon)
85 Grams Honey (1/4 Cup)
56 Grams Butter (1/4 Cup)
1 Large Egg
Oat Topping
1 Large Egg
15 Grams Water (1 Tablespoon)
10 Grams Quick Oats (2 Tablespoons)
Additional Equipment
Small and Large Mixing Bowls
Wooden Mixing Spoon
Measuring Cups and Spoons
Kitchen Scale
Cambro Container with Lid
One 9-inch by 5-inch pan
Cooling Rack
Oven Mitts
Instructions
In the bowl of a standing mixer, stir together yeast and warm water. Let rest for 10 to 15 minutes until foamy.
In a separate mixing bowl, combine the dry ingredients: flour, oats, and salt.
Set the standing mixer to low. Add the dry ingredients and mix with the dough hook. Gradually mix in in the wet ingredients: honey, butter, and egg.
Continue mixing with the dough hook until the dough pulls away from and cleans the sides of the bowl. The dough will feel smooth and slightly tacky. If sticky, add flour a tablespoon at a time. If too dry, add water a tablespoon at a time.
Place dough in a lightly greased container. Cover and let rise until doubled and puffy, about 1 hour.
Punch down dough and shape into a sandwich loaf. Place in a lightly greased 9-inch by 5-inch bread pan. Cover and let rise until the dough reaches above the lip of the pan, about 30 minutes to 45 minutes.
Preheat the oven to 375° Fahrenheit (190° Celsius) and bake for 35 to 40 minutes.
Turn out bread onto a wire cooling rack and allow it to cool completely before slicing and serving.
Enjoy!
#bread#bread recipes#yummy#yummy food#tasty#tasty food#yumminess#tasty recipes#bake from scratch#Honey Oat Bread#Sandwich Bread#Honey Oat Sandwich Bread#Simple Bread#Simple Honey Oat Bread#Good food#food recipes
3 notes
·
View notes
Text
Amish Double Chocolate Chip Bread
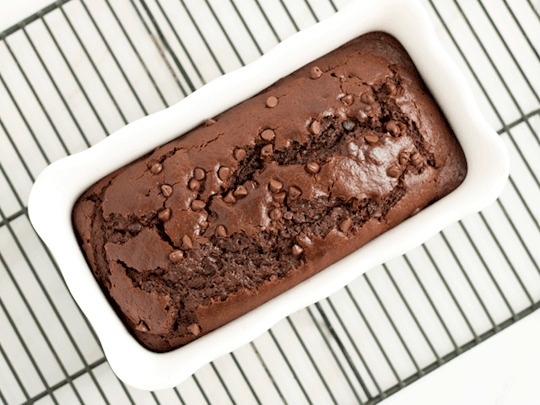
Check out my new Amish Double Chocolate Chip Bread recipe!
For those in a rush, I’m re-posting the basic recipe here on my Tumblr. But if you want the full picture-by-picture instructions, nutritional information, and secrets to success you can go to my website.
Here’s what you’ll need…
Ingredients
Starter
60 Grams Warm Water (1/4 Cup)
7 Grams Dry Active Yeast (2 Teaspoons)
150 Grams All-Purpose Flour (1 Cup)
200 Grams White Granulated Sugar (1 Cup)
240 Grams Milk (1 Cup)
Bread
150 Grams All-Purpose Flour (1 Cup)
100 Grams White Granulated Sugar (1/2 Cup)
50 Grams Cocoa Powder (1/2 Cup)
2.5 Grams Baking Powder (1/2 Teaspoon)
2.5 Grams Baking Soda (1/2 Teaspoon)
3 Grams Salt (1/2 Teaspoon)
96 Grams Melted Butter or Vegetable Oil (1/2 Cup)
122 Grams Milk (1/2 Cup)
2 Grams Vanilla Extract (1/2 Teaspoon)
265 Grams Amish Friendship Starter (1 Cup)
2 Large Eggs
42 Grams Chocolate Chips (1/4 Cup)
*Note that this only uses 1 cup of starter to make 1 loaf of bread.
Additional Equipment
Ziploc Bag
Permanent Marker
Measuring Cups, Bowls, and Spoons
Two 9 X 5 Inch Bread Pans
Parchment Paper
Wire Cooling Rack
Oven Mitts
Instructions
To Make the Starter
On a Ziploc Bag write the following instructions: Day 1: Do Nothing Day 2: Mash the Bag Day 3: Mash the Bag Day 4: Mash the Bag Day 5: Mash the Bag Day 6: Add 150 Grams Flour (1 Cup), 200 Grams Sugar (1 Cup), 240 Grams Milk (1 Cup) Day 7: Mash the Bag Day 8: Mash the Bag Day 9: Mash the Bag Day 10: Pour entire bag into nonmetal bowl. Add 150 Grams Flour (1 Cup), 200 Grams Sugar (1 Cup), and 240 Grams Milk (1 Cup). Measure 260 Grams Starter (1 Cup) into 4 Ziploc bags. Give 3 bags away and keep 1 starter for yourself. With the remaining starter in the bowl, use it to make bread
In the Ziploc bag, combine the ingredients for the starter: water, yeast, flour, sugar, and milk. Mash the ingredients together until well incorporated.
Follow the rest of the instructions as written on the bag.
To Make the Bread
Preheat oven to 325° Fahrenheit (162° Celsius).
In a large mixing bowl, whisk together your dry ingredients: flour, sugar, cocoa, baking powder, baking soda, and salt.
In a small mixing bowl, whisk your wet ingredients: vegetable oil, milk, vanilla extract, eggs, and starter.
Pour the wet ingredients into the dry ingredients and stir until just moistened. Fold in chocolate chips.
Pour batter into a lightly greased 9-inch by 5-inch bread pan.
Sprinkle a few extra chocolate chips on top.
Bake bread for 1 hour. Insert a toothpick into the center, and if it comes out clean, you’re done!
Use a butter knife to loosen the loaves from the sides of the pans, but don’t turn them out just yet! Let them cool for an hour in the pan before you turn them out onto a wire rack to finish cooling.
NOTES
This recipe also makes for great muffins! Follow the instructions for making bread, but instead of baking at 350 degrees Fahrenheit (176 degrees Celsius) for an hour, bake them for 25 to 30 minutes in a muffin tin instead.
Enjoy!
#bread#bread recipes#yummy#yummy food#tasty#tasty food#yumminess#tasty recipes#bake from scratch#amish friendship bread#chocolate bread#chocolate chip bread#double chocolate chip bread#dessert bread#dessert loaf#dessert for breakfast#dessert
9 notes
·
View notes
Text
Amish Friendship Cinnamon Bread

Check out my new Amish Friendship Cinnamon Bread recipe!
For those in a rush, I’m re-posting the basic recipe here on my Tumblr. But if you want the full picture-by-picture instructions, nutritional information, and secrets to success you can go to my website.
Here’s what you’ll need…
Ingredients
Starter
60 Grams Warm Water (1/4 Cup)
7 Grams Dry Active Yeast (2 Teaspoons)
150 Grams All-Purpose Flour (1 Cup)
200 Grams White Granulated Sugar (1 Cup)
240 Grams Milk (1 Cup)
Bread
300 Grams All-Purpose Flour (2 Cups)
200 Grams White Granulated Sugar (1 Cup)
5 Grams Ground Cinnamon (2 Teaspoons)
9 Grams Baking Powder (1 1/2 Teaspoons)
2 Grams Baking Soda (1/2 Teaspoons)
6 Grams Salt (1 Teaspoon)
240Grams Vegetable Oil (1 Cup)
120 Grams Milk (1/2 Cup)
4 Grams Vanilla Extract (1 Teaspoon)
2 Large Eggs
520 Grams Amish Friendship Bread Starter (2 Cups)
Topping
50 Grams White Granulated Sugar (1/4 Cup)
2 Grams Ground Cinnamon (1 Teaspoon)
Additional Equipment
Ziploc Bag
Permanent Marker
Measuring Cups, Bowls, and Spoons
Two 9 X 5 Inch Bread Pans
Parchment Paper
Wire Cooling Rack
Oven Mitts
Instructions
To Make the Starter
On a Ziploc Bag write the following instructions: Day 1: Do Nothing Day 2: Mash the Bag Day 3: Mash the Bag Day 4: Mash the Bag Day 5: Mash the Bag Day 6: Add 150 Grams Flour (1 Cup), 200 Grams Sugar (1 Cup), 240 Grams Milk (1 Cup) Day 7: Mash the Bag Day 8: Mash the Bag Day 9: Mash the Bag Day 10: Pour entire bag into nonmetal bowl. Add 150 Grams Flour (1 Cup), 200 Grams Sugar (1 Cup), and 240 Grams Milk (1 Cup). Measure 260 Grams Starter (1 Cup) into 4 Ziploc bags. Give 3 bags away and keep 1 starter for yourself. With the remaining starter in the bowl, use it to make bread
In the Ziploc bag, combine the ingredients for the starter: water, yeast, flour, sugar, and milk. Mash the ingredients together until well incorporated.
Follow the rest of the instructions as written on the bag.
To Make the Bread
Preheat oven to 325° Fahrenheit (162° Celsius).
In a large mixing bowl, whisk together your dry ingredients: flour, sugar, cinnamon, baking powder, baking soda, and salt.
In a small mixing bowl, whisk your wet ingredients: vegetable oil, milk, vanilla extract, eggs, and starter.
Pour the wet ingredients into the dry ingredients and stir until just moistened.
Pour batter into two lightly greased 9-inch by 5-inch bread pans.
In a smaller bowl, whisk together the cinnamon and sugar. Dust over the top of the batter in the pans.
Bake bread for 1 hour. Insert a toothpick into the center, and if it comes out clean, you’re done!
Use a butter knife to loosen the loaves from the sides of the pans, but don’t turn them out just yet! Let them cool for an hour in the pan before you turn them out onto a wire rack to finish cooling.
NOTES
This recipe also makes for great muffins! Follow the instructions for making bread, but instead of baking at 350 degrees Fahrenheit (176 degrees Celsius) for an hour, bake them for 25 to 30 minutes in a muffin tin instead.
Enjoy!
#bread#bread recipes#yummy#yummy food#tasty#tasty food#yumminess#tasty recipes#bake from scratch#amish friendship bread starter#amish friendship bread#cinnamon bread#cinnamon quick bread#dessert bread#dessert for breakfast
4 notes
·
View notes
Text
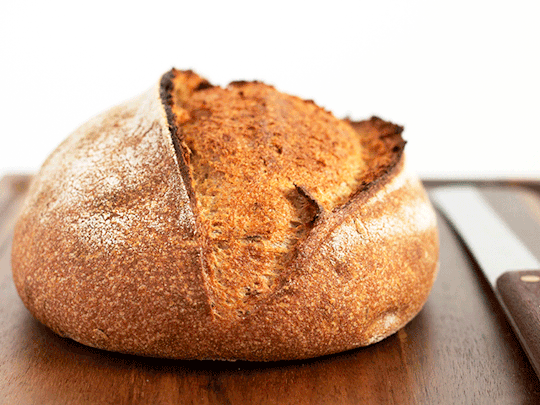
Same-Day Artisan-Style 75% Wheat Bread
Check out my new same-day artisan-style 75% wheat bread recipe!
For those in a rush, I’m re-posting the basic recipe here on my Tumblr. But if you want the full picture-by-picture instructions, nutritional information, and secrets to success you can go to my website.
Here’s what you’ll need…
Ingredients
375 Grams (2 3/4 Cups + 2 Tablespoons) Wheat Bread Flour*
125 Grams (1 Cup + 2 Teaspoons) White Bread Flour*
400 Grams (1 2/3 Cup) Warm Water
10.5 Grams (1 3/4 Teaspoon) Fine Sea Salt
1.5 Grams (1/2 Teaspoon) Dry Active Yeast
Don’t have wheat bread flour or rye bread flour? Neither do I. I actually grind my own flour and use vital wheat gluten to increase the protein content. Here’s my substitute:
356.25 Grams (2 3/4 Cups) Whole Wheat Flour
118.75 Grams (1 Cup) All-Purpose Flour
25 Grams (3 Tablespoons) Vital Wheat Gluten
Additional Equipment
Kitchen Scale
Measuring Cups, Bowls, and Spoons
4 to 6 Quart Container with Lid
Bench Scraper/Dough Cutter
Banneton Basket
4 to 5 Quart Dutch Oven
High-Heat Parchment Paper
Bread Lame
Wire Cooling Rack
Oven Mitts
Instructions
10:00 AM – Mix flour and water by hand in plastic container until just incorporated. Cover and let rest for 1 hour.
11:00 AM – Add salt and yeast and mix thoroughly. Cover and let rest for 30 minutes.
11:30 AM – 12:30 PM – Stretch and fold the dough three times with 30 minute rests between each session.
12:30 PM to 2:30 PM – Bulk ferment the dough until it has doubled in volume.
2:30 PM to 2:45 PM – Shape and pre-shape the dough into a round.
2:45 to 3:30 PM – Transfer dough to a floured banneton basket. While the dough proofs, preheat the Dutch oven in the oven to 475° Fahrenheit (246° Celsius).
3:30 PM – 4:00 PM – Turn the dough out onto parchment paper. Score the dough, and transfer the dough to the Dutch oven. Replace lid and bake for 30 minutes.
4:00 PM – 4:15 PM – Remove lid from Dutch oven, and bake for another 15 minutes.
4:15 PM – 5:00 PM – Turn loaf out onto a wire cooling rack and allow it to cool completely before slicing and serving.
Enjoy!
#bread#bread recipes#wheat bread recipes#wheat bread#mixed flour#mixed flour bread#artisan bread#artisan bread recipes#beginning baking#beginning recipes#yummy#yummy food#yumminess#tasty#tasty recipes#tasty food#tasty bread#bake from home#bake from scratch
2 notes
·
View notes
Text
A Beginner Baker’s Guide to Gluten

Gluten gets a lot of negative attention these days thanks to the dieting industry. Many influencers claim that by eliminating gluten from the foods you eat, you can boost your energy levels and maintain a healthy weight.
But is gluten really that bad? How does gluten actually affect you? And should you remove it from your baking?
Let’s take a closer look at gluten to answer some of the most commonly asked questions by beginning bakers.
What Is Gluten?
Gluten is a catch-all term for storage proteins found in certain grains, specifically wheat, rye, barley, and triticale. These naturally occurring proteins like to stick together, creating a structural network similar to glue. In baking, gluten gives dough its stretchy, elastic texture, and it traps gasses and moisture to give bread its soft, distinctive chew.
What Is Vital Wheat Gluten?
If you’ve browsed some of my recipes, you may have noticed that a few recipes call for high-protein bread flour or a combination of vital wheat gluten and all-purpose flour.
Vital wheat gluten is a powdered form of gluten that many bakers use as an additive to increase flour’s protein content. If you’re making an artisan-style sourdough loaf, the extra gluten can improve your dough’s stability and structure, making it easier to shape.
Is Gluten Bad for You?
The human body uses enzymes to break down consumed proteins such as gluten, though it doesn’t break down gluten completely. For some people, the undigested gluten triggers an autoimmune response when it reaches the small intestine, resulting in unpleasant symptoms such as bloating, diarrhea, headaches, and even rashes.
However, for the rest of us, undigested gluten poses no risk, and gluten itself is a reliable source of protein and fiber. Furthermore, going gluten-free does not guarantee any weight loss benefits on its own. Many gluten-free processed foods rely on starches to hold and stabilize food as a substitute for gluten. These starches can actually raise blood sugar levels and cause weight gain rather than being the advertised cure-all.
Which Flours Have the Most Gluten?

To find out which flours have the most gluten for your baking (as well as which flours are gluten free), read the rest of The Beginner Baker’s Guide to Gluten at BreadbytheHour.com
5 notes
·
View notes
Text
Naturally-Leavened Cold-Proof Artisan-Style White Sourdough Bread

Check out my new Naturally-Leavened, Cold-Proofed, Artisan-Style White Bread recipe!
For those in a rush, I’m re-posting the basic recipe here on my Tumblr. But if you want the full picture-by-picture instructions, nutritional information, and secrets to success you can go to my website.
Here’s what you’ll need…
Ingredients
Levain
6 Grams (3/4 Teaspoon) Sourdough Starter
50 Grams (1/4 Cup + 2 Tablespoons) Whole Wheat Flour or Bread Flour
60 Grams (1/4 Cup) Water
Bread Dough
500 Grams (4 Cups + 2 1/2 Tablespoons) Bread Flour*
400 Grams (1 2/3 Cup and 1/2 Tablespoon) Water
12 Grams (2 Teaspoons) Fine Sea Salt
Don’t have wheat bread flour or rye bread flour? Neither do I. I actually grind my own flour and use vital wheat gluten to increase the protein content. Here’s my substitute:
472 Grams (3 3/4 Cups and 2 Tablespoons and ) All-Purpose Flour
28 Grams (3 Tablespoons and 1 Teaspoon) Vital Wheat Gluten
Additional Equipment
Kitchen Scale
Container With Lid
Bench Scraper/ Dough Cutter
Banneton Basket
High-Heat Parchment Paper
Bread Lame
Dutch Oven
Wire Cooling Rack
High-Heat Oven Mitts
Instructions
Day 1
10:30 AM – Feed your starter 40 grams whole wheat flour and 40 grams water.
10:30 PM – Make your levain and autolyse your wheat flour with half the water.
Day 2
9:30 AM – Autolyse the flour by combining 500 grams flour with 400 grams water. Mix until a shaggy dough forms. Let rest for 30 minutes.
10:00 AM – Mix in the levain into the flour mixture. Let rest for 30 minutes.
10:30 AM – Mix the 12 grams of salt into the dough. Let rest for 30 minutes.
11:00 AM – 12:30 PM – Stretch and fold the dough 4 times with 30 minute breaks between each session.
12:30 PM – 2:30 PM – Bulk fermentation at room temperature in a covered container.
2:30 PM – Midnight – Transfer container to refrigerator and continue bulk fermentation.
Day 3
12:01 AM – 9:00 PM – Continue bulk fermentation in the fridge.
9:30 PM – 10:30 PM Remove dough container from the fridge and let sit on the counter at room temperature.
10:30 PM – Pre-shape the dough. Cover with the container and let rest for 15 to 20 minutes.
10:45 PM – Final shape the dough. Transfer to a Banneton basket, cover, and place in the fridge over night.
Day 4
9:30 AM – Preheat the Dutch oven inside the oven at 500° Fahrenheit (260° Celsius) for 45 minutes to 1 hour.
10:25 AM – Remove the dough from the fridge. Transfer to high-heat parchment paper, and score with a lame.
10:30 AM – Transfer the dough to the Dutch oven. Place an ice cube inside and add lid. Bake for 45 minutes covered.
11:15 AM – Place bread on a cooling rack and let cool completely before slicing and serving.
Enjoy!
#Bread#artisan bread#artisan bread recipes#sourdough#sourdough bread#sourdough bread recipes#artisan sourdough#artisan sourdough bread#artisan sourdough bread recipes#sourdough starter#levain#white bread#white bread recipes#yummy#tasty#yummy recipes#yummy food#tasty food#tasty recipes#bake from home#bake from scratch
4 notes
·
View notes
Text
Sourdough Discard Poppy Seed Lemon Bread
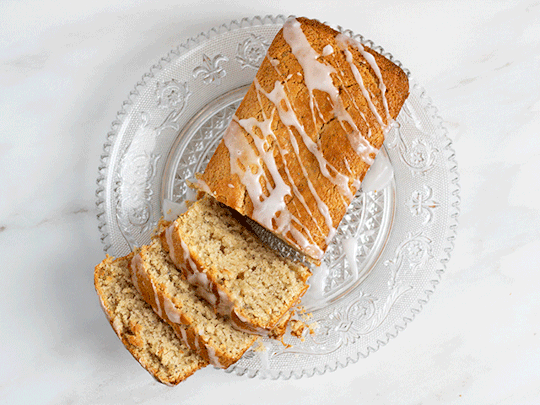
Check out my new Sourdough Discard Poppy Seed Lemon Quick Bread!
For those in a rush, I’m re-posting the basic recipe here on my Tumblr. But if you want the full picture-by-picture instructions, nutritional information, and secrets to success you can go to my website.
Here’s what you’ll need…
Ingredients
180 Grams (1 1/2 Cups) All-Purpose Flour
201 Grams (1 Cup) White Sugar
6 Grams (1 1/2 Teaspoons) Baking Powder
5 Grams (1 Teaspoon) Salt
3 Grams (1 1/2 Teaspoons) Poppy Seeds
226 Grams (1 Cup) Sourdough Discard
55 Grams (1/4 Cup) Milk
2 Grams (1/2 Teaspoon) Vanilla Extract
2 Grams (1/2 Teaspoon) Lemon Extract
112 Grams (1/2 Cup) Butter, Melted
1 Large Egg
Optional Glaze
32 Grams (1/4 Cup) Confectioners’ Sugar
10 Grams (1 to 2 Teaspoons) Milk
Additional Equipment
Mixing Bowls, Cups, Spoons
Kitchen Scale
9-Inch by 5-Inch Baking Pan
Wire Cooling Rack
Oven Mitts
Probe Thermometer
Instructions
Preheat oven to 350° Fahrenheit (176° Celsius).
In a large mixing bowl, whisk together the dry ingredients: flour, sugar, baking powder, salt, and poppy seeds.
In a smaller mixing bowl, combine wet ingredients: sourdough discard, milk, vanilla extract, lemon extract, butter, and egg.
Stir wet ingredients into dry ingredients and stir until just moistened.
Pour batter into a lightly greased (or parchment lined) 9-inch by 5-inch baking pan.
Bake at for 50 minutes to 55 minutes. Internal temperature should reach at least 195° Fahrenheit (90° Celsius).
Let cool in pan on wire cooling rack for 15 minutes.
Turn out bread onto wire cooling rack and allow to cool completely.
Mix the powdered sugar and milk to form a glaze. When bread has cooled, drizzle glaze over the crust.
Enjoy!
#Bread#bread recipes#easy bread recipes#sourdough#sourdough bread#sourdough bread recipes#sourdough discard#sourdough starter#sourdough discard bread#lemon bread#poppy seed lemon bread#sourdough discard poppy seed lemon bread#yummy#yummy recipes#bake from home#bake from scratch#homemade bread#dessert bread#quick bread
10 notes
·
View notes
Text
Honey Almond Flour Bread (Gluten Free)

Check out my new Honey Almond Flour Bread!
For those in a rush, I’m re-posting the basic recipe here on my Tumblr. But if you want the full picture-by-picture instructions, nutritional information, and secrets to success you can go to my website.
Here’s what you’ll need…
Ingredients
280 Grams Almond Flour (2 1/2 Cups)*
2.5 Grams Baking Soda (1/2 Teaspoon)
3 Grams Salt (1/2 Teaspoon)
3 Large Eggs, Separated
42 Grams Honey (2 Tablespoons)
2.4 Grams Apple Cider Vinegar or Lemon Juice (1/2 Teaspoon)
Optional
7 Grams Slivered Almonds (1 Tablespoon) for Topping
7 Grams Almond Extract (1 Teaspoon) for Stronger Almond Flavor
Additional Equipment
Mixing Bowls, Cups, Spoons
Kitchen Scale
8-Inch by 4-Inch Baking Pan
Electric Hand Mixer
Wire Cooling Rack
Oven Mitts
Probe Thermometer
Instructions
Preheat oven to 300° Fahrenheit (148° Celsius) and place the rack on the bottommost setting.
In a large mixing bowl, sift together the dry ingredients: flour, baking soda, and salt.
In a smaller mixing bowl, whisk the wet ingredients together: egg yolks, honey, and apple cider vinegar (or lemon juice). Add almond extract if using.
In a medium mixing bowl, use an electric hand mixer to beat the egg whites until soft peaks form.
Gently fold the wet ingredients into the dry ingredients, and slowly add in the egg whites. Mix until fully incorporated.
Pour the batter into a lightly greased 8-inch by 4-inch loaf pan. Wet the back of a spatula with water and level the tops and corners of the batter. Sprinkle slivered almonds over the top, if using.
Bake for 33 to 35 minutes. The internal temperature of the bread should read between 200° and 205° Fahrenheit (93° and 95°Celsius).
Let cool in pan on wire cooling rack for 15 minutes.
Use a knife to loosen bread from pan and turn out onto wire cooling rack to finish cooling.
Enjoy!
#bread#bread recipes#easy bread recipes#almond flour#almond flour bread#honey almond flour bread#gluten free#gluten free recipes#gluten free bread#gluten free almond flour bread#yummy#yummy recipes#tasty#tasty recipes#bake at home#bake from scratch
17 notes
·
View notes
Text
5 Tips for Baking Bread in Summer

Whether you’re working with yeast or with sourdough starter, your breads will naturally rise or fall depending on the temperature in your home.
Ideally, your bread will rise best when your home consistently stays between 68 and 72 degrees Fahrenheit (20 and 22 degrees Celsius).
However, during the summer months, your home might go above those ideal temperatures, easily reaching 75 degrees and above. And the higher the temperature, the faster your bread will proof.
If your bread rises too quickly, it may taste bland and will struggle to hold its shape. So what can you do to slow that rise this summer?
1. Use Cool Water in Your Recipe
Many recipes recommend using warm water to proof yeast. Dry active yeast proofs best between 105 and 115 degrees Fahrenheit (40 and 46 degrees Celsius). If the water is too cold, the yeast will remain dormant and won’t give your bread lift.
However, during the summer, that warm water will contribute to a fast-rising loaf. If you want to slow your bread’s rise, you’ll have to be more strategic with your liquid ingredients.
Set aside some warm water to activate your yeast, but use cold water to autolyse your dough. Although your dough will reach room temperature eventually, the cold water will slow things down.
2. Add a Little More Salt
Yeast feeds on the sugars and starches in your flour. Although yeast does not need water to feed, yeast does need water to properly absorb oxygen and nutrients.
Salt, in contrast, is hygroscopic, meaning it attracts water and other moisture. When present in your bread dough, salt pulls water from the yeast, which then slows its fermentation process.
During the summer, you may want to consider adding an extra gram or two of salt to slow your yeast’s activity and counter the high temperatures in your kitchen. However, you should note that excessive amounts of salt can strain or even kill your yeast, and too much salt will impact the overall flavor of your bread.
Not sure how much to add?
If you understand baker’s percentages, you can use up to 2% salt in your recipe without having any negative impact on your bread’s fermentation process. Above 2% salt, the bread’s fermentation will slow noticeably. At 8% salt, the yeast will become dormant.
So if you try to counter excessive kitchen temperatures with salt, keep the salt well below the 8% mark. And don’t forget to take notes on your recipe changes to see what works best for you.
3. Decrease Your Fermentation Time
Scientifically speaking, the rate of metabolism and carbon dioxide production doubles for every 18 degrees Fahrenheit (10 degrees Celsius) increase in temperature. Bread dough at 86 degrees Fahrenheit (30 degrees Celsius) will rise twice as fast as dough at 68 degrees (20 degrees Celsius).
By the time your home temperature reaches 90 degrees (32 degrees Celsius), the yeast becomes so active that it will push gluten strands beyond their ability to hold together. Even if you knead your bread for extended times and use extra vital wheat gluten, your dough may devolve into a sticky, gloopy mess if you let your bread rise too long in warm temperatures.
To avoid over proofing your dough, you may need to cut your total rise time to compensate summer baking. So if a recipe calls for a 4 hour rise time at 68 degrees Fahrenheit (20 degrees Celsius), your dough may be done in as little as 2 hours if your kitchen hovers at 86 degrees (30 degrees Celsius).
Keep in mind that long rise times are important for maximizing flavors in your bread. Short rise times in summer may result in blander bread, so consider alternative methods for slowing your yeast activity. Or make sure that your bread has additional ingredients such as milk, eggs, or butter to lend your bread flavor and structure.
Want to Read the Rest?
Stop by BreadbytheHour.com and see my article: 5 Tips for Baking Bread in Summer. Don’t forget to check out my other helpful baking tips or see my latest bread recipes.
6 notes
·
View notes
Text
50/50 Wheat and Rye Artisan-Style Sourdough Bread
Check out my new 50/50 Wheat and Rye Artisan-Style Sourdough Bread recipe!
For those in a rush, I’m re-posting the basic recipe here on my Tumblr. But if you want the full picture-by-picture instructions, nutritional information, and secrets to success you can go to my website.
Here’s what you’ll need…
Ingredients
Levain
2 Grams (1/2 Teaspoon) Sourdough Starter
18 Grams (1 Tablespoon and 1 Teaspoon) Whole Wheat Flour
20 Grams (1 Tablespoon and 1 Teaspoon) Water
Bread Dough
250 Grams (2 Cups and 1 Tablespoon and 3/4 Teaspoon) Whole Wheat Bread Flour *
250 Grams (2 1/4 Cups and 3 Tablespoons) Rye Bread Flour *
450 Grams (1 3/4 Cup and 2 Tablespoons) Water, Divided
14 Grams (2 Teaspoons) Fine Sea Salt
7 Grams (1 Tablespoon) Caraway Seeds
Don’t have wheat bread flour or rye bread flour? Neither do I. I actually grind my own flour and use vital wheat gluten to increase the protein content. Here’s my substitute:
236 Grams (1 3/4 Cups) Whole Wheat Flour
236 Grams (2 1/4 Cups and 2 1/2 Teaspoons) Rye Flour
28 Grams (3 Tablespoons and 1 Teaspoon) Vital Wheat Gluten
Additional Equipment
Kitchen Scale
Container With Lid
Bench Scraper/ Dough Cutter
Banneton Basket
High-Heat Parchment Paper
Bread Lame
Dutch Oven
Wire Cooling Rack
High-Heat Oven Mitts
Instructions
Day 1
10:30 AM – Feed your starter 40 grams whole wheat flour and 40 grams water.
10:30 PM – Make your levain and autolyse your wheat flour with half the water.
Day 2
10:30 AM – Combine your levain, your rye flour, and remaining water. Let rest for 30 minutes.
11:00 AM – Add salt and caraway seed and mix well. Let rest for 30 minutes.
11:30 AM – 1 PM – Stretch and Fold dough 4 times with 30 minute breaks between each session.
1 PM – 6:45 PM – Bulk fermentation.
6:45 PM – Pre-shape dough. Let rest for 15 to 20 minutes.
7:00 PM – Shape dough. Transfer to banneton basket. Cover and retard in the fridge.
Day 3
1:00 PM – Preheat Dutch oven inside the oven at 450° Fahrenheit (232° Celsius) for 45 minutes to an hour.
1:55 PM – Turn dough out onto parchment paper and score.
2:00 PM – Bake bread for 25 minutes with Dutch oven lid on.
2:25 PM – Remove lid and bake for 20 minutes.
2:45 PM – Turn bread out onto a wire cooling rack and allow to cool completely.
Enjoy!
#Bread#Artisan Bread#Artisan Bread recipes#Sourdough#Sourdough bread#Sourdough bread recipes#artisan sourdough#artisan sourdough bread#artisan sourdough bread recipes#sourdough stsarter#levain#wheat bread#whole wheat bread#wheat bread recipes#whole wheat bread recipes#rye bread#rye bread recipes#wheat and rye#wheat and rye bread#wheat and rye bread recipes#yummy#tasty#tasty food#tasty recipes#yummy recipes#bake from home#bake from scratch
14 notes
·
View notes