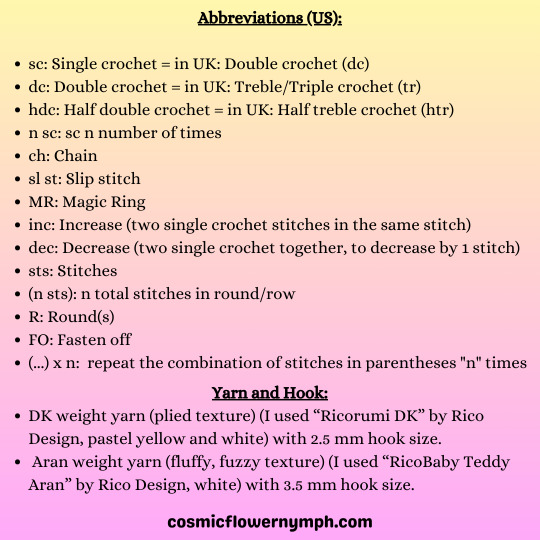
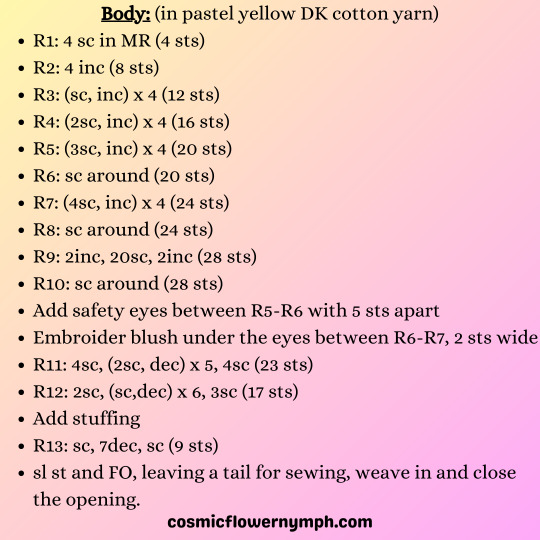
#free crochet pattern
Text

Snoopy Fans! Crochet a Woodstock Amigurumi, Free Pattern! 👉 https://buff.ly/38EVGRJ 💛
700 notes
·
View notes
Photo

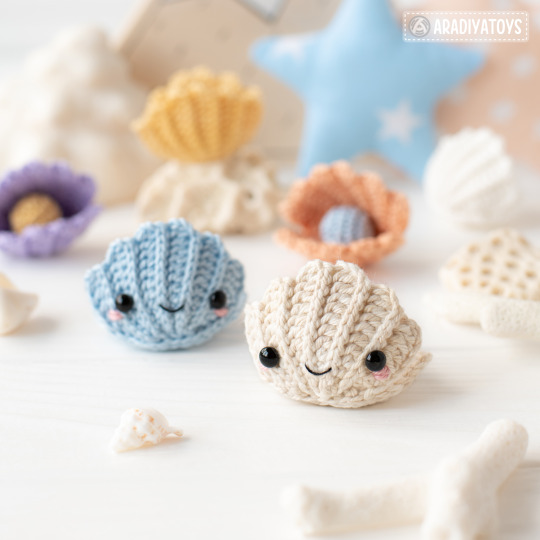
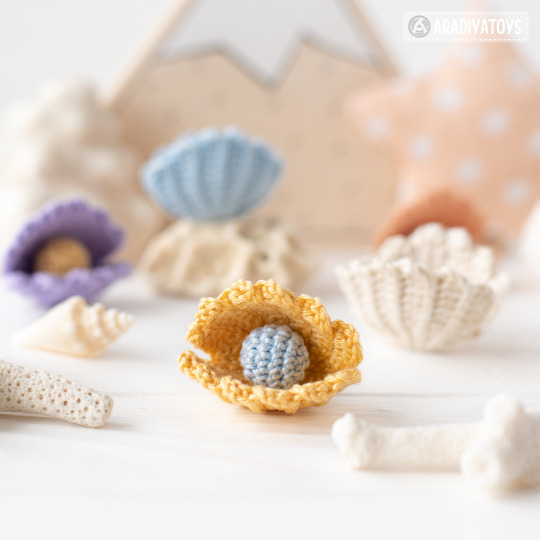
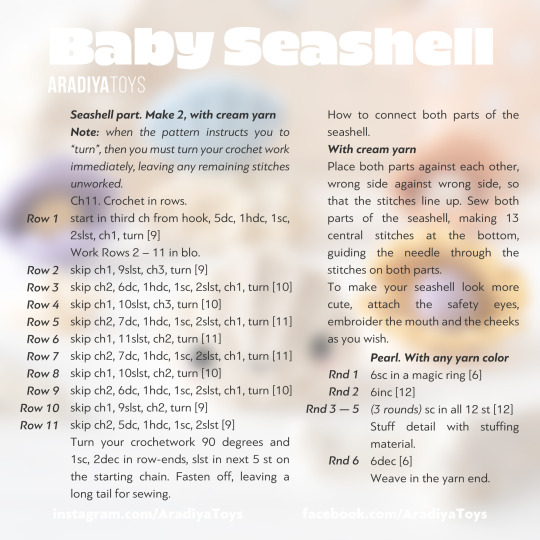
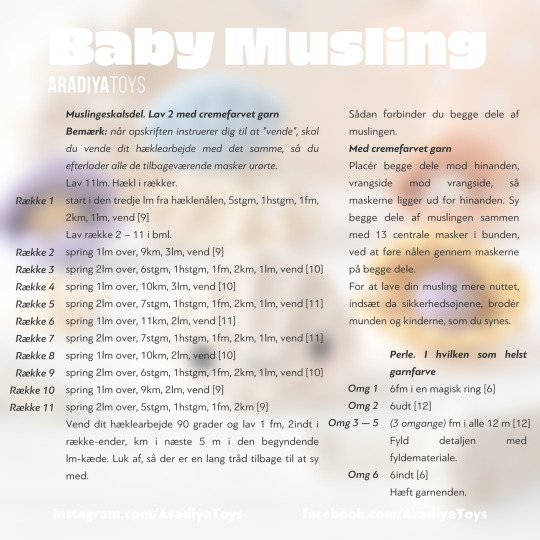

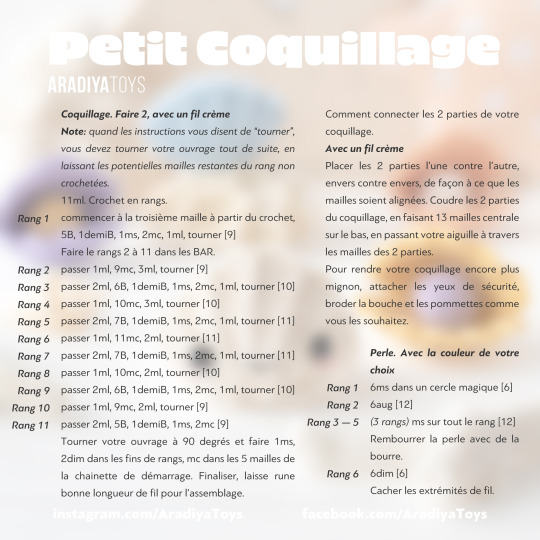


🚨[FREE BABY SEASHELL PATTERN!]🚨
Once upon a time, in the deep blue ocean, there was a tiny Baby Seashell. She lived among the mermaids 🧜🏻♀️ crabs 🦀 and octopuses 🐙 in a beautiful underwater world 🌊 The Baby Seashell loved to play hide-and-seek with her octopus friends and listen to the beautiful songs 🎶 of the mermaids. She would also often explore the nearby coral reefs 🪸 marveling at the vibrant colors and the exotic sea creatures that called it home. Despite being small, the Baby Seashell had a big heart ❤️ and always looked out for her friends, whether it was helping a crab mend a broken shell or sharing a tasty seaweed snack with the mermaids. Life was full of adventure and wonder in the deep ocean, and the Baby Seashell couldn't wait to see what each new day would bring! 🥰
Baby Seashell is a FREE addition to my Kawaii Ocean Minis crochet pattern that includes Mermaid, Triton, Octopus, Hermit Crab and Seahorse and is available here -> https://etsy.me/41Oz4GU 😊
FREE Crochet pattern for amigurumi Baby Seashell is available in English, Spanish, French, Italian, Dutch, Portuguese and Danish, browse through the gallery to see all of these languages! 🤗
Happy crocheting and have a wonderful weekend, dear friends! 💛💙
#AradiyaToys#olka novytska#amigurumi#crochet#handmade#crochet pattern#free crochet pattern#free crochet tutorial#free#free amigurumi pattern#kawaii#seashell#ocean world#kawaii ocean minis#DIY#cute#adorable
1K notes
·
View notes
Photo
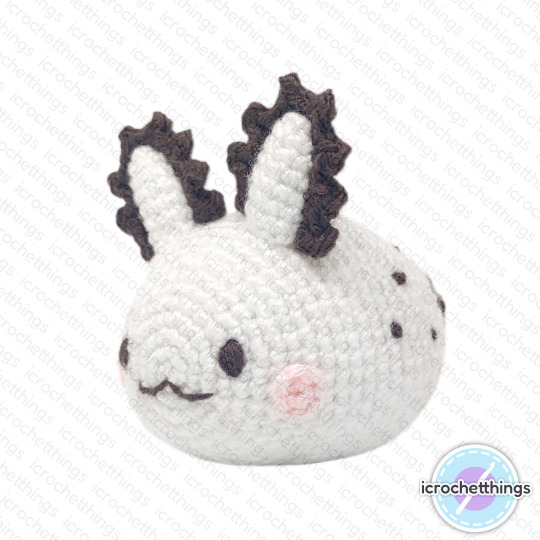
Sea Bunny Amigurumi Pattern
The pattern is available as a PDF on Ravelry.
Check out my other patterns on Ravelry and Etsy.
This is an icrochetthings original pattern © 2023. For personal use only. Do not copy, sell, alter, or distribute this pattern or parts of it. You may sell a limited number of your handmade finished items provided you credit icrochetthings as the designer.
Size: 3” tall, 3.5″ long
Materials:
• DK weight yarn in white, brown, pink
• C (2.75mm) crochet hook
• Stuffing
• Scissors
• Yarn needle
Some knowledge of embroidery is needed to complete the pattern as shown. You should be familiar with the following technique(s):
• French knot
#crochet#crochet pattern#free crochet pattern#amigurumi#amigurumi pattern#free amigurumi pattern#handmade#plush#sea bunny
958 notes
·
View notes
Text
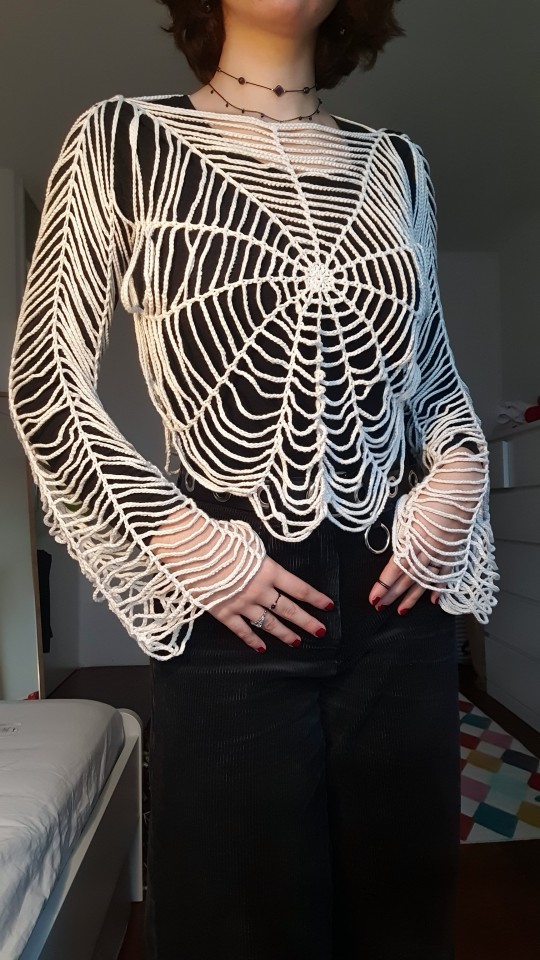

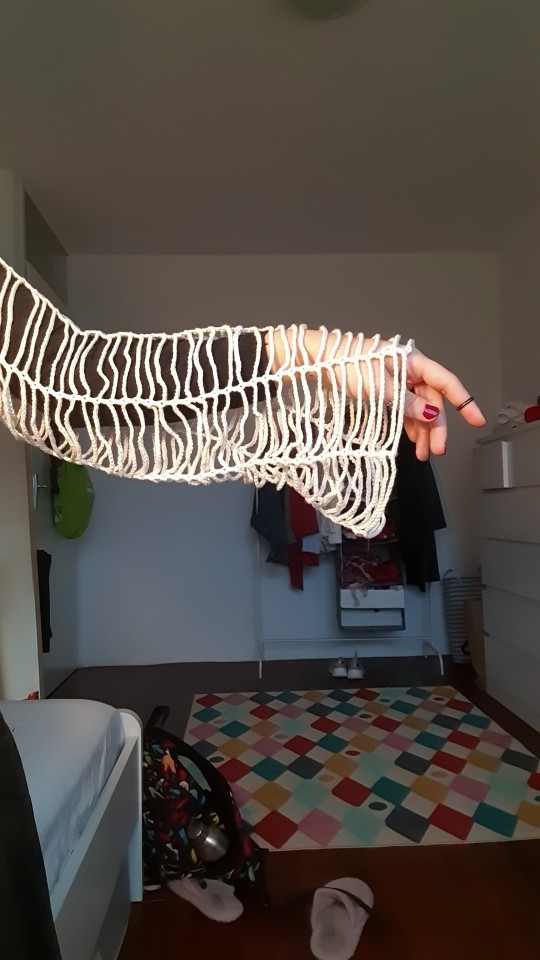
FINAL UPDATE FOR THE SPIDER WEB SWEATER:
I FINISHED IT YALL!! wore it for the first time ever and it felt absolutely amazing. I didn't think I would love it that much but it is now my child. Thank you for coming along on this mini journey, I want to start a new top soon so stay tuned for that <3
pattern is made by @/aperpetualmess on youtube!!
youtube
#crochet#crochet clothes#halloween crochet#handmade#crochet sweater#craftblr#crocheting#spider web#free crochet pattern#crochet pattern#free pattern#Youtube
377 notes
·
View notes
Photo


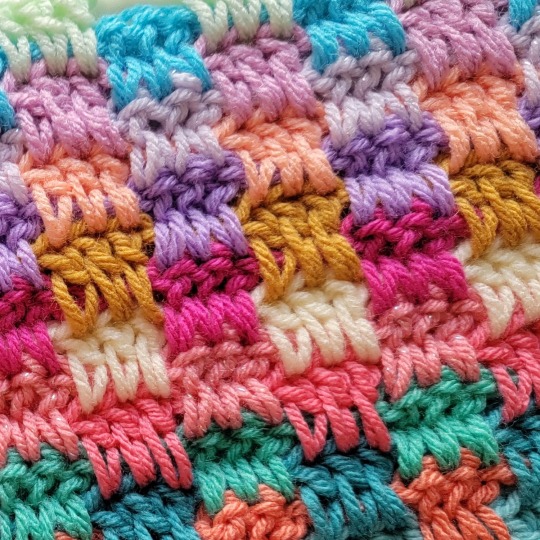
It's #wipwednesday! What are you working on this week? 👋🌟💝
Next free blanket on my hook! This is the Triple Interlocking Block Stitch, video on my YouTube channel! Tutorial here! 💖
Link to my blog/website: https://crochetml.com/
https://crochetml.com/free-crochet-patterns/
Check out the tiktok here!
#yarn#fiber#fiber art#fiber arts#fiber artists#fiber artist#crochet#crocheting#crocheted#crochet pattern#crochet patterns#free crochet pattern#free crochet tutorial#free crochet patterns#free crochet tutorials#crochet tutorial#crochet tutorials#video#videos#tiktok#tiktoks#diy#how to#crafts#crafting#crafty#craft#wip#wips#work in progress
884 notes
·
View notes
Text

MY WEBBY DOLL IS FINISHED!!!!!
she’s soooo soft and cuddly and i absolutely love her
pattern under the cut!!!


104 notes
·
View notes
Text
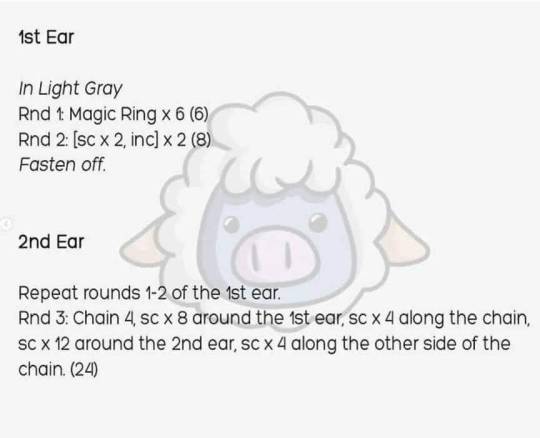
Free pattern ❤️❤️❤️
#free cross stitch pattern#free crochet pattern#free pattern#free amigurumi pattern#free crochet patterns#free#crochet amigurumi#crochet pattern#crochet#amigurumi bear#amigurumi pattern#amigurumi
73 notes
·
View notes
Text
I crocheted a newborn guinea pig today
https://www.ravelry.com/patterns/library/newborn-guinea-pig
#wheek wheek#guinea pig#newborn guinea pig#rodents#rodentblr#cavyblr#crochet#amigurumi#crafts#handmade#yarn crafts#yarnblr#crochetblr#free pattern#free crochet pattern#ravelry
74 notes
·
View notes
Text

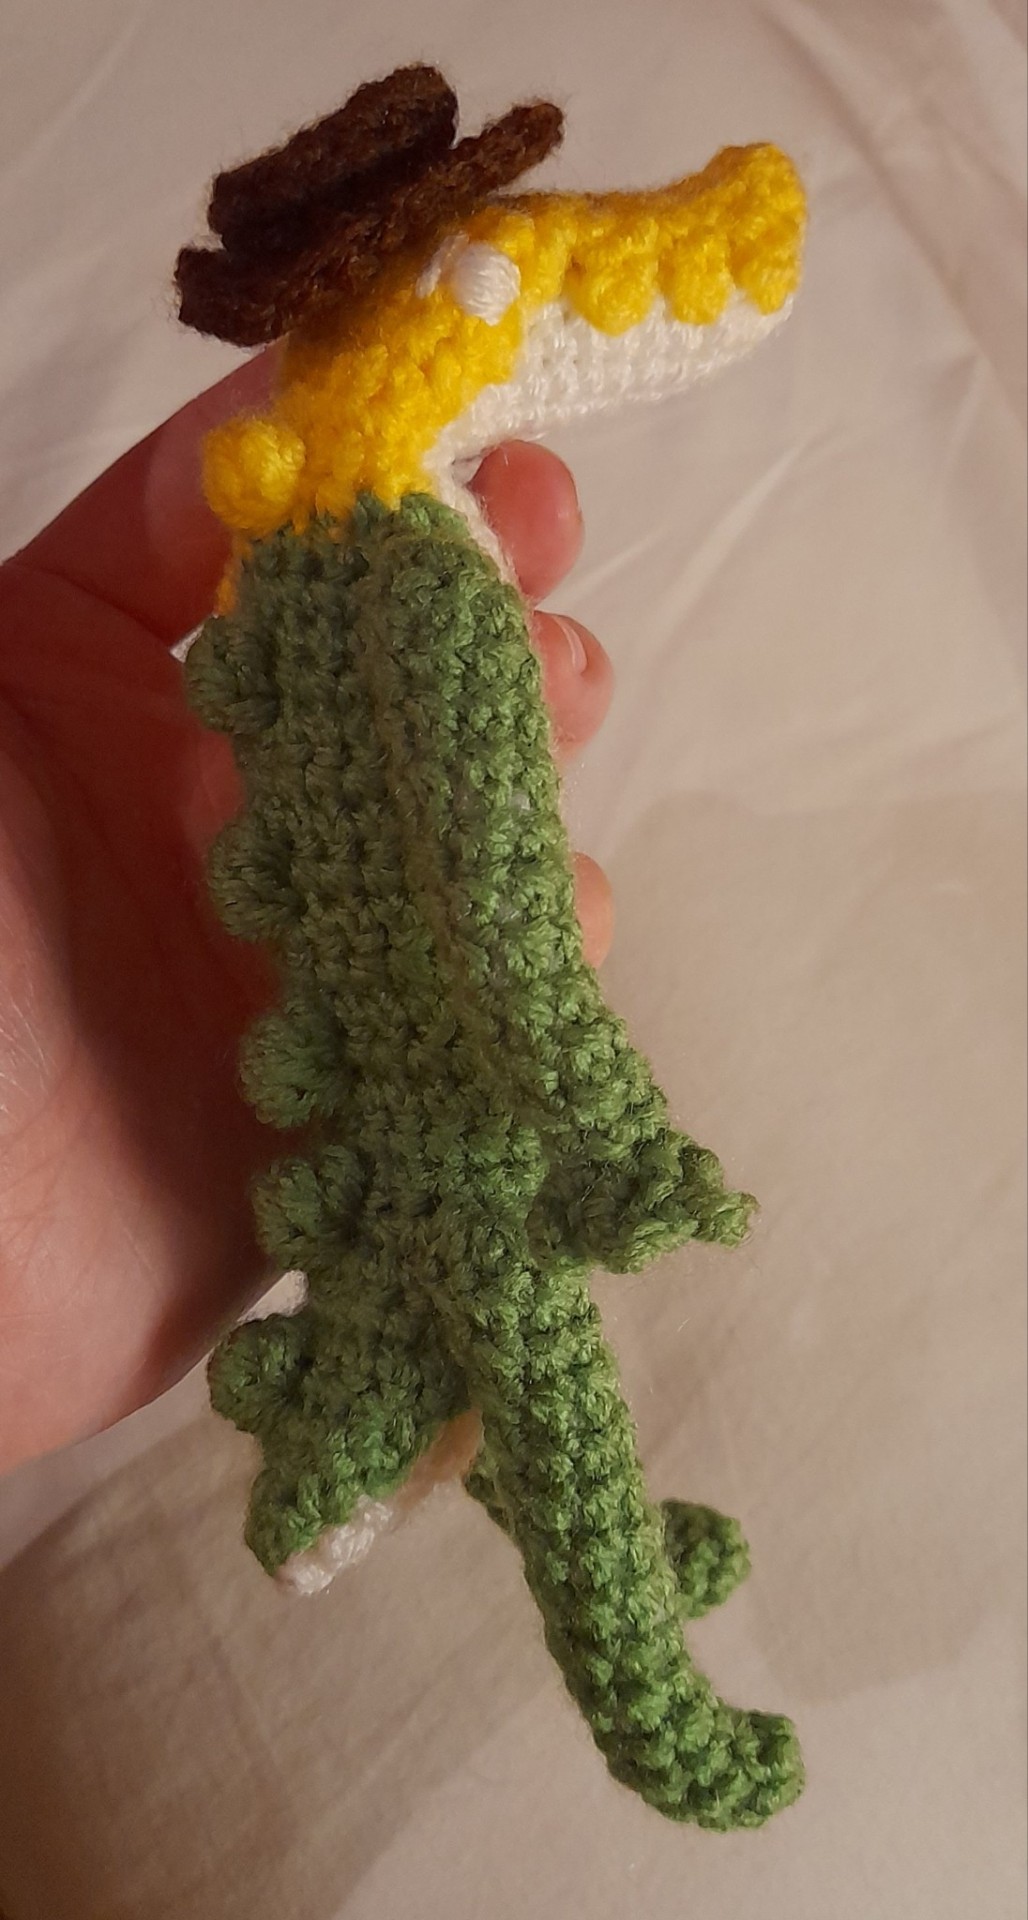
Jackie the pirate mushroom by Khuc Cay
Free crochet pattern here
284 notes
·
View notes
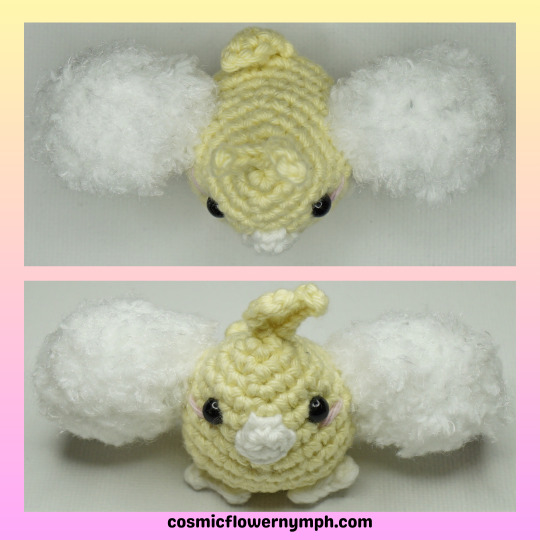
Text
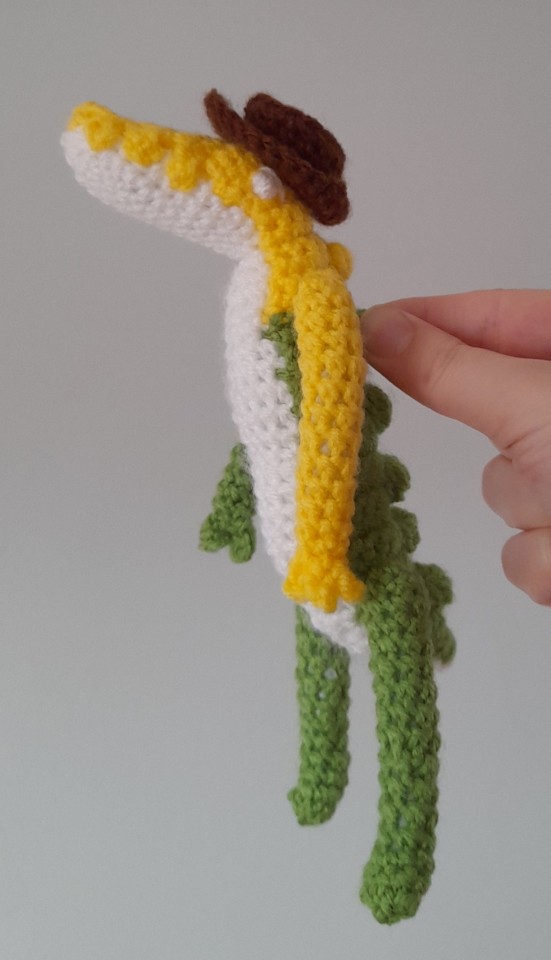
Gummigoo free crochet pattern
FREE pattern at my Ravelry link and under the cut! Pattern includes photo references.
My boy is done! I started making myself a Gummigoo right after seeing episode 2 of The Amazing Digital Circus. While I was making it I realised that you guys might want one too. This doll and this pattern weren't nearly as tough to make as I thought they would be, and I really enjoyed making them.
PDF now edited to remove typo and add another couple of photos.
Pattern and photos under cut!
You need:
(less than) 50g/150m of the following colours of yarn: white, yellow, green, brown
3.5mm hook
Stuffing
Pins
Scissors
Special stitches used:
Picot: chain 3, then slip stitch into the back loop of the first chain.
Bobble: Yarn over. Pull up a loop, yarn over and pull through two, do 4 more times until you have 6 loops on the hook. Yarn over and pull through all six. Pull stitch a little tight.
Triple bobble (regular bobble stitch but twice as tall): Yarn over twice. Pull up a loop, yarn over and pull through two, yarn over and pull through two again, do 4 more times until you have 6 loops on the hook. Yarn over and pull through all six. Pull stitch a little tight.
Double decrease (a decrease over 3 stitches): Pull up a loop through each of 3 stitches, yarn over and pull through all three.
HEAD (white)
1. 6sc into a magic ring [6]
2. 6 inc [12]
3. sc around [12]
4. 2sc, 2 dec, 6sc [10]
5. 2sc, 2inc, 6sc [12]
6-8. sc around (3 rounds) [12]
9. (2sc, inc) x2, 6sc [14]
See special stitches for how to do a bobble stitch -- it's five double crochets to create one stitch.
10. 4sc, bobble stitch, 2sc, bobble stitch, 6sc [14]
11. 4sc, bobble stitch, 2sc, bobble stitch, 6sc [14]
12. 1sc, dec, 6sc, dec, 3sc [12]
13. (2sc, dec) x3 [9]
Stuff.
14. 1sc, dec) x3 [6]
Cut a tail long enough to sew with. Thread the yarn through the front loops of each remaining stitch and pull to cinch the hole shut. Leave the tail out until needed for sewing.
BODY (white)
1. 6sc into a magic ring
2. 6 inc [12]
3. (5sc, inc) x2 [14]
4-5. sc around (2 rounds) [14]
6. (6sc, inc) x2 [16]
7. (7sc, inc) x2 [18]
8-10. sc around (3 rounds) [18]
Stuff as you go. It's hard to stuff long pieces at last minute.
11. (7sc, dec) x2 [16]
12. sc around [16]
13. (6sc, dec) x2 [14]
14. sc around [14]
15. (5sc, dec) x2 [12]
16. sc around [16]
17. (5sc, inc) x2 [14]
18. sc around [14]
19. 1sc, 4dec, 1sc, 4inc [14]
20. 1sc, 4hdc, 9sc [14]
21. 1sc, 4hdc, 9sc [14]
22. 1sc, 2dec, 9sc [12]
23. 4hdc, 8sc [12]
24. 2dec, 8sc [10]
25. Dec, 8sc [9]
Finish stuffing.
26. (1sc, dec) x3 [6]
Cut the yarn, cinch the hole shit and hide the end.
Connect the head to the body at the very back of the bottom of the head. It should face forwards levelly with the torso erect (90°). The head and neck should connect smoothly at the back to the body.
OVERLAY (yellow and green)
Start in yellow.
1. 6sc into a magic ring [6]
2. 2sc, inc, 2sc. Leave last stitch unworked. Picot (chain 3 and slip stitch into the back loop of the first chain) and turn. [6]
3. 6sc. Picot and turn. [6]
4. 4sc, inc. Leave last stitch unworked. Picot and turn. [6]
5. 4sc, inc. Leave last stitch unworked. Picot and turn. [6]
6. 2sc, inc, 1sc, inc. Leave last stitch unworked. Picot and turn. [7]
7. 3sc, inc, 1sc, inc. Leave last stitch unworked. Picot and turn. [8]
8. 3sc, inc, 2sc, inc. Leave last stitch unworked. Chain (not picot!) and turn. [9]
9. 4sc, inc, 2sc, inc. Leave last stitch unworked. Chain and turn. [10]
10. 4sc, inc, 4sc, inc. Chain and turn. [12]
11. 10sc, dec. Chain and turn. [11]
12. 9sc, dec. Chain and turn. [10]
13. 4sc, dec, 4sc. Chain and turn. [9]
14. 9sc. Chain and turn. [9]
15. 9sc. Chain and turn. [9]
The next row will start colour changing to green. Always hide yarn on the wrong side of the work. There will also be a triple bobble (same as a bobble stitch but with triples -- see special stitches).
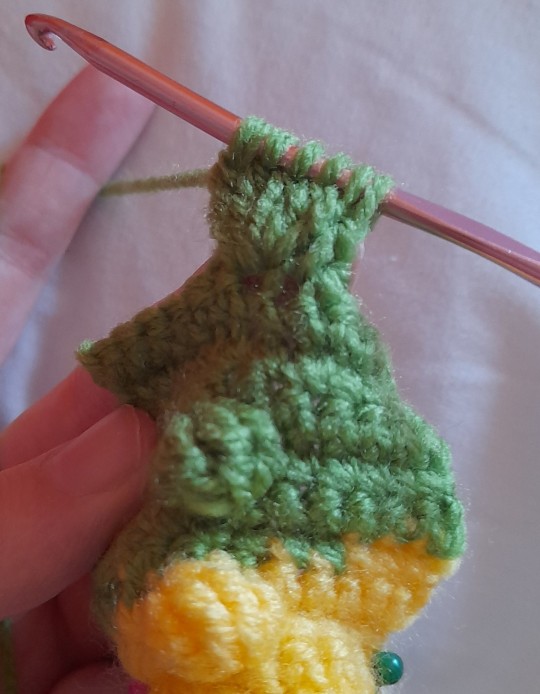
Bobbles aren't exactly sharp, but neither are gummy spikes tbh.
16. (Right side is facing you, hide yarn at back:) Inc, 3sc, triple bobble stitch, 2sc, change to green, sc, inc. Chain and turn. [11]
Careful not to skip stitches. Bobbles like to squish the stitches at the side of them and this makes them easy to skip while you're crocheting.
17. (Wrong side is facing you, hide yarn at front:) Inc, 5sc, change to yellow, 4sc, inc. Chain and turn. [13]
18. 3sc, change to green, 10sc. Chain and turn. [13]
13sc in green. Chain and turn. [13]
There will be no more yellow stitches. Leave enough yellow tail to stitch the yellow part on and cut the yarn.
19. 6sc, triple bobble, 6sc. Chain and turn. [13]
Again, careful not to skip stitches around bobbles. Count the stitches at the end of the row following a bobble.
20-22. 13sc (3 rows) [13]
23. 6sc, triple bobble, 6sc. Chain and turn. [13]
24-26. 13sc (3 rows) [13]
27. 6sc, triple bobble, 6sc. Chain and turn. [13]
28-30. 13sc (3 rows) [13]
31. Dec, 4sc, triple bobble, 4sc, dec. Chain and turn. [11]
32-34. 11sc (3 rows) [11]
35. Dec, 3sc, triple bobble, 3sc, dec. Chain and turn. [9]
36. Dec, 5sc, dec. Chain and turn. [7]
37. Dec, 3sc, dec. Chain and turn. [5]
38. Dec, 1sc, dec. Chain and turn. [3]
39. Double decrease (decrease over 3 stitches). Chain 1.
Pull enough yarn through the chain to stitch the green parts down and cut the yarn.
Pin the overlay in place. It should go from just over the tip of the snout to the very tip of the tail, and should fit snuggly and symmetrically. Remember to shape the angles -- the snout should face forwards, the tail should face backwards, the torso should be upright.
Pin the teeth individually if you have enough pins. This ensures the spaces between are visible when connected. The teeth may be uneven/asymmetrical on opposite sides of the mouth due to the way the picots stagger, but just make sure they're pinned and sewn okay and they'll look even.
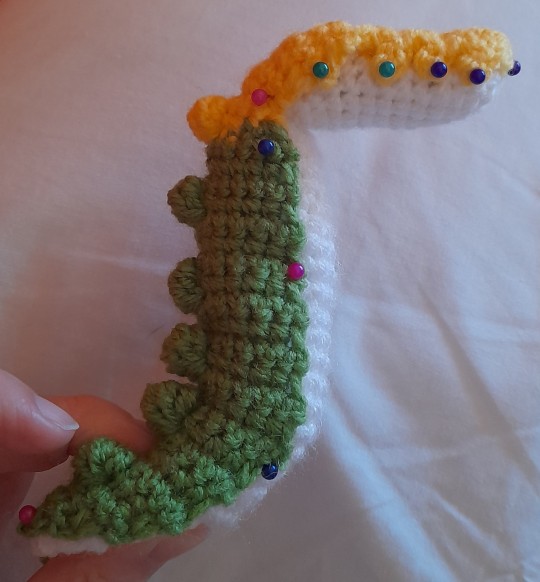
Note the shape -- it'll need to be bent like this when you fit the overlay on or it'll scrunch when bent later.
Sew! You don't have to go into every row, sewing every other stitch of the body should connect it okay with no glaring gaps. Make sure to sew with the correct colour of yarn tail.
Embroider on a couple of white eyes underneath the eyebrow ridges, with small eyebrows in white.
The eyes are embroidered on with an eyebrow each.
ARMS (one yellow, one green)
Start with a magic ring and leave enough of a tail to attach the end. Leave this end hanging outside the arm.
1. 7sc into a magic ring [7]
2-6. sc around (5 rounds) [7]
7. 2sc, dec, 3sc [6]
8-14. sc around (7 rounds) [6]
Stuff.
15. sc, (picot, sc in the next stitch) x4, slip stitch into the last stitch. Cut the yarn and cinch the palm shut, not too tightly. Hide the end inside.
The green arm is sewn on the higher-green shoulder and the yellow arm on the yellower side. Make sure the biggest finger gap is facing inwards to the body, this is like the wrist.
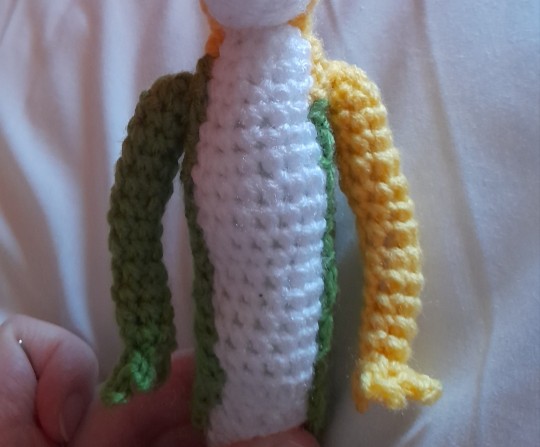
Leave a gap for the neck and match the arms to the shoulders. You'll find that the arms and fingers are a little bit posable.
LEGS (x2 in green)
Start with a magic ring and leave enough of a tail to attach the end. Leave this end hanging outside the leg.
1. 7sc into a magic ring [7]
2-9. sc around (8 rounds) [7]
10. 2sc, dec, 3sc [6]
11-13. sc around (3 rounds) [6]
14. 4inc, 2sc [10]
15. dec, 4sc, 2dec [7]
Stuff.
Cut yarn and cinch hole shut.
The legs should be connected at the hips with the legs pointing straight down and should connect closely at the top of the leg to make the hips look smoothly attached.
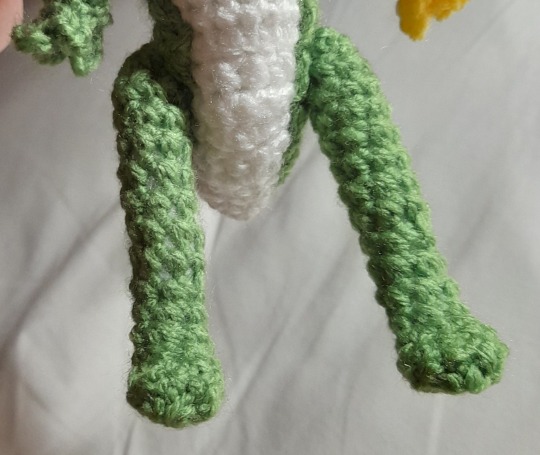
The hips are not at the lowest point of the body, they're where the lower curve begins to happen when the torso is straight upright and the tail points backwards.
HAT (brown)
1. 8sc into a magic ring [8]
2. (2sc, 2inc) x2 [12]
3. 3sc, 2inc, 4sc, 2inc, 1sc [16]
4. In the back loops only, 4sc, dec, 6sc, dec, 2sc [14]
5-6. In both loops, 14sc (2 rounds) [14]
7. In the front loops only, (1sc, inc) x7 [21]
8. In both loops, 5sc, hdc, 2dc in 1, 2dc in 1, hdc, 7sc, hdc, 2hdc in 1, hdc, 2sc [24]
Slip stitch and finish off.
The wider part of the brim with the dcs is the front of the hat. Attach the hat by either tying a string under the chin, or by sewing a couple of inner rim stitches to the head to keep it in place.
Sewn in place by two stitches at opposite sides of the inner edge. Yeehaw.
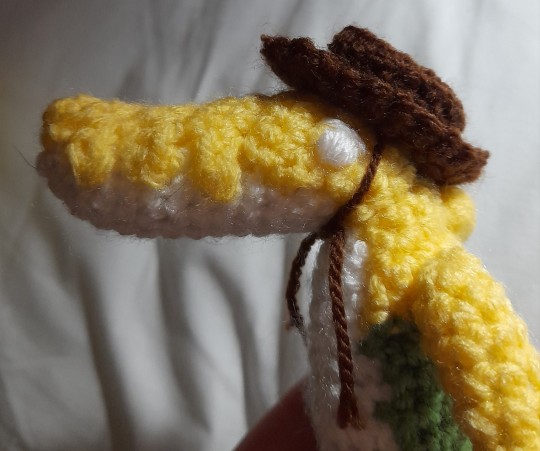
Hat connected by its straps: non-canonical but cute.
And that's it! Gummigoo is done.
I love my lil guy. Hope nothing bad happens to him when I show my friend Caine
#crochet#free crochet pattern#amigurumi#gummigoo#tadc#the amazing digital circus#gumigoo#gummygoo#tadc episode 2#tadc ep 2#tadc gummigoo
79 notes
·
View notes
Text
instagram
This is the pattern I’m currently working on. I can’t wait to show the finished product!
#crochet#crocheting#yarn crafts#crochetblr#yarnblr#art#amigurumi#crocheters of tumblr#yarn#crochet yarn#crochet pattern#free crochet pattern#pokemon#pokémon plush#ditto#amigurumi love#kawaii#Instagram
103 notes
·
View notes
Photo
Junimo Amigurumi Pattern
Check out my other patterns on Ravelry and Etsy.
Pattern is available as a PDF on Ravelry.
Working on uploading some stuff from my backlog of patterns. Stardew Valley was one of my comfort games during 2020. That game eats free time like no one’s business.
This is an icrochetthings original pattern © 2023. For personal use only. Do not copy, sell, alter, or distribute this pattern or parts of it. You may sell a limited number of your handmade finished items provided you credit icrochetthings as the designer.
Size: 3” tall
Materials:
• DK weight yarn in green, black, pink
• C (2.75mm) crochet hook
• 6mm safety eyes
• Stuffing
• Scissors
• Yarn needle
#crochet#crochet pattern#free crochet pattern#amigurumi#amigurumi pattern#free amigurumi pattern#handmade#plush#junimo#stardew valley
1K notes
·
View notes
Text
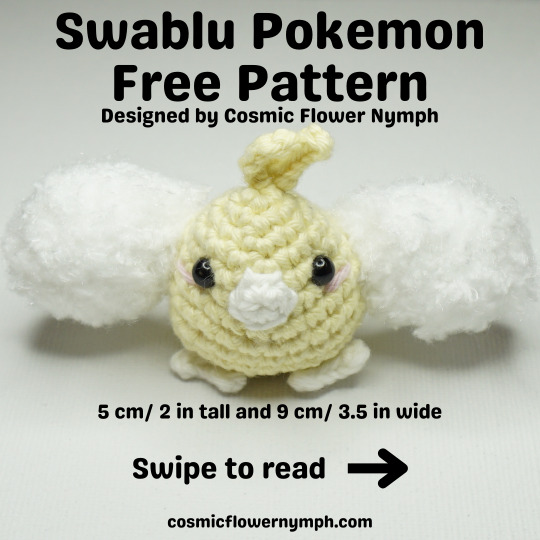
I hope you enjoy making this cute small shiny Swablu Pokemon! I will make more free fanart patterns regularly over time to share with you! I would appreciate it if you repost this post, maybe more crocheters might want to try this pattern! Thank you!!
#amigurumi#amigurumi doll#amigurumi pattern#crochet#crochet ideas#crochet inspiration#crochet pattern#crocheters of tumblr#artists on tumblr#crocheting#pokemon crochet#crochet pokemon#amigurumay#amigurimi#free crochet pattern#free amigurumi pattern
56 notes
·
View notes
Text
I wasn’t expecting to face reveal so soon but I recently stumbled on some information that I feel all knitters and crocheters need to know! This video is from my TikTok but I thought I’d crosspost as I know Tumblr has a large community of hand crafters.
Hobbycraft is a UK craft store brand (trusted, don’t worry!) and they have HUNDREDS of free patterns for knitters and crocheters. I believe they can be use worldwide too - I don’t think this is UK exclusive.
Crafting should be accessible to all, no matter your financial situation so if you’re like me and need cheap or free options for patterns, Hobbycraft can help!
#face reveal#knitting#knitblr#crochet#crochetblr#crochet pattern#knitting pattern#free patterns#free knitting pattern#free crochet pattern#knittersoftheworld#hand crafters
543 notes
·
View notes
Text
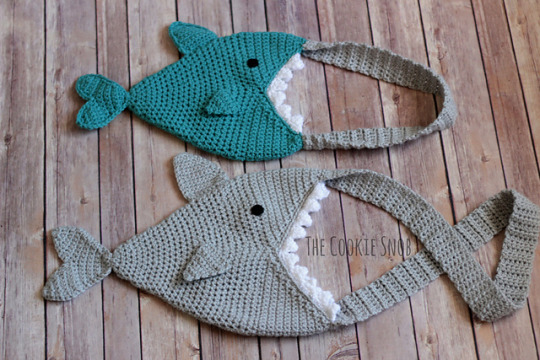

Crochet a Shark Bag - It's Got a BIG Bite and the Pattern is FREE! 👉 https://buff.ly/2Wlyzrc 🦈
388 notes
·
View notes
Text
Gin pattern yayy!!!! Have fun if you try to make him!!!

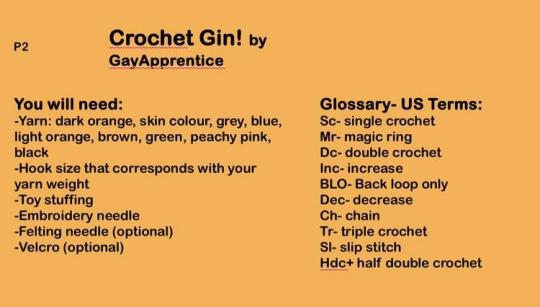
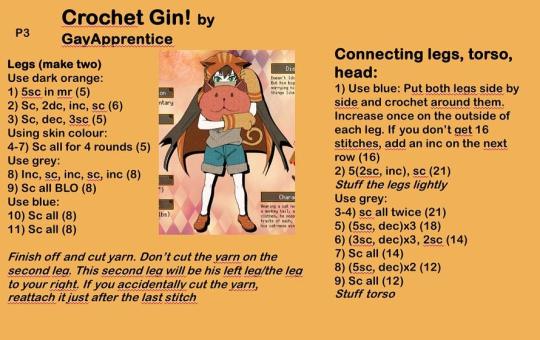

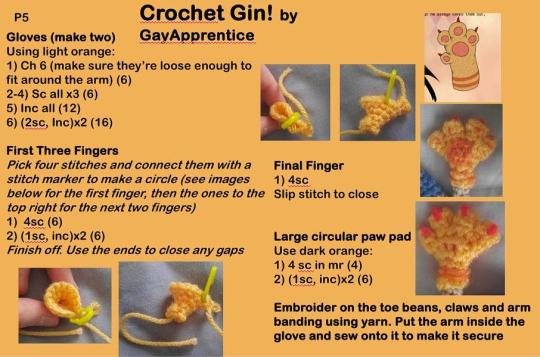
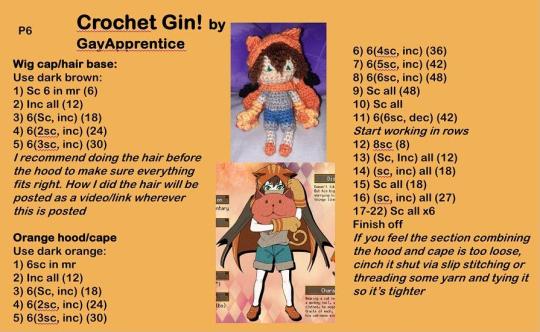

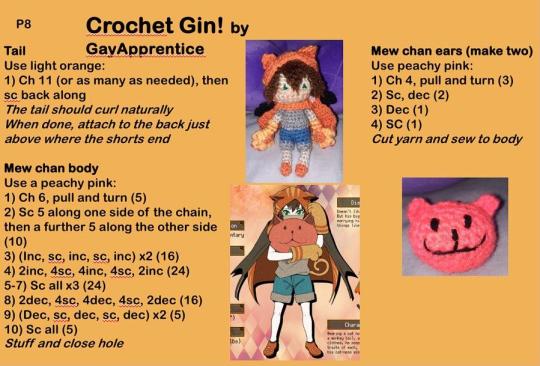
Hair video is here:
https://vm.tiktok.com/ZGexd5r2m/
#your turn to die#yttd gin ibushi#yttd#yttd gin#gin ibushi#crochet#free crochet pattern#amigurumi#kimi ga shine#gay's crochet
54 notes
·
View notes
Last Seen Blogs
robboyblunder
Robboyblunder's Art Blog

envystar8
Photomatt needs to resign!

pddyocnnr-blog
* not / here !

morna-1
▪︎ MorNa ♡ CMBYN ▪︎ Charmie for ever! EGBA

serpent-under-the-flower
Pottah!!!!