#copicsketch
Text
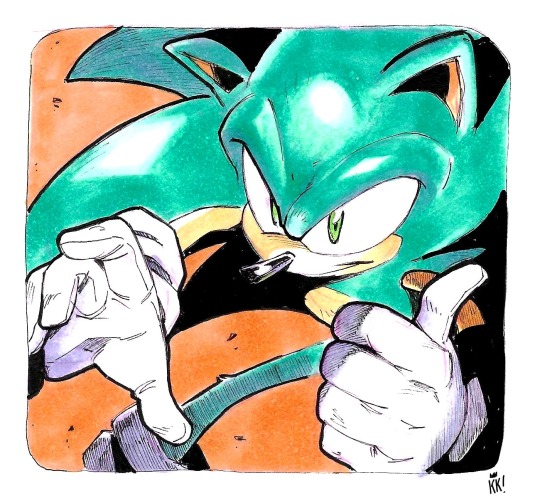
Sonic drawn with Copics 💙🫐🌀
#sonic#sonic the hedgehog#sth#sonic fanart#sonic fandom#sonic games#sth fanart#sonic art#traditional art#sonic the hedgehog fanart#sth series#sth art#sth fandom#copicdrawing#copic art#copic markers#copicillustration#copicsketch#traditional drawing#traditional illustration#traditional sketch
411 notes
·
View notes
Text
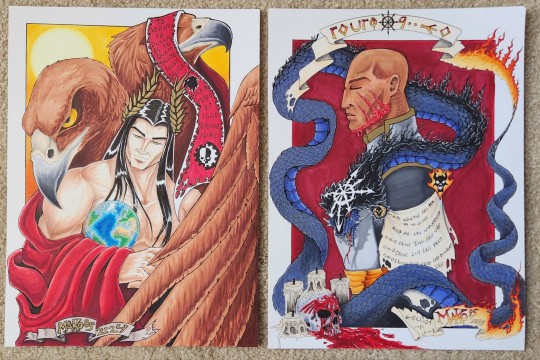


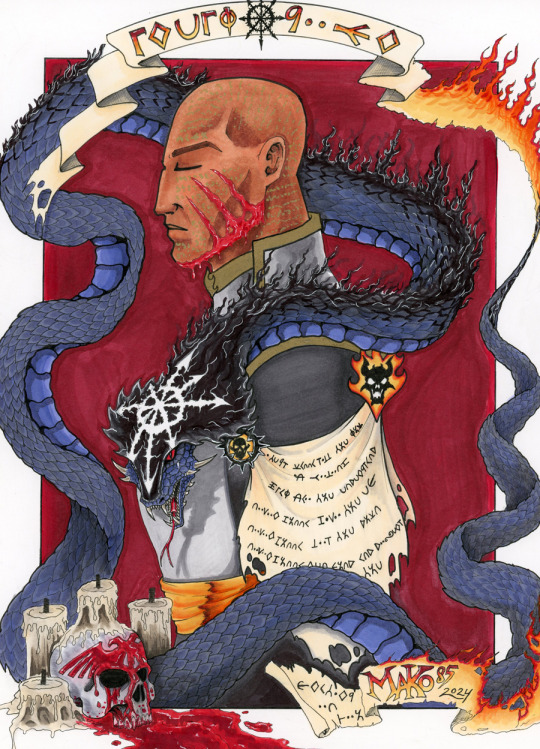
The Emperor of Mankind and Lorgar Aurelian, Light and Darkness, Hope and Rain, 2 sides of a coin but in truth one and same ❤️
129 notes
·
View notes
Text

This is the first time I’ve drawn Grover with crutches and wow that was difficult. I used like a million references but I still feel like I messed up on the legs
#art#artist#fanart#pjo#percy jackson#illustration#my artwork#pjo tv show#traditional art#annabeth chase#grover underwood#percy jackson and the olympians#percy jackson tv show#percy jackson disney+#percy jackson casting#rick riordan#riordanverse#copicsketch#copic markers#copicdrawing#artwork#young artist#black artist#queer artist#percy jackson fanart
2K notes
·
View notes
Text

Good ole Philza
221 notes
·
View notes
Text
Absol art
Absol 💙Trying out a new style! Ink and markers
What do you think, yay or nay? 🤔💭
I have mixed feelings about this one, didn’t really like it at first but it’s grown on me.
#pokemon#pkmnart#pkmn fanart#pkmn#absol#hoenn#hoennregion#pokemonartist#darkpokemon#pokeball#pokecenter#pokemoncommunity#pokemonart#markerart#copicsketch#copicillustration#inkart#pendrawing#monochromeart#copic markers#ink drawing#marker
64 notes
·
View notes
Text

Little sketch of my friends cat.
194 notes
·
View notes
Text
Copic Markers on Bristol Board, 2020

#copic#copic markers#gameboy#gameboy color#art#artists on tumblr#copicillustration#copicink#copicsketch#Mr_Rebecca#Rebecca Maughan#neon aesthetic#neon art#markers
431 notes
·
View notes
Text
かわいすぎる。
68 notes
·
View notes
Text

Finally scanned #baizhu - did this piece at @momocon - I waited three years for this man and he's worth it. Though I do wish they had kept his original looser pants.
Also dammit tumblr use hashtags like every other platform
@genshinimpact #genshinimpact #genshinimpactfanart #genshinimpactbaizhu #hoyoverse #hoyocreators #dendro #green @copic_official @copic_official_us #copicsketch #copicmarkers #snake #whitesnake
#art#heidi black#heidiblack#convention#genshin impact#genshin fanart#baizhu#copic markers#copic art#copicdrawing#copicsketch#copicillustration
95 notes
·
View notes
Text
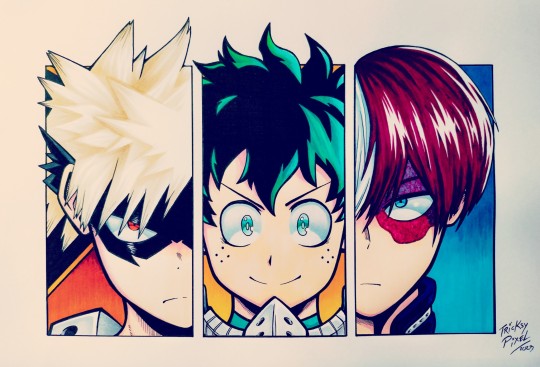
Drew my favourite heroes ✨
#illustration#drawing#art#fan art#anime#copic#copic art#copic markers#copicillustration#copicsketch#my hero academia#mha#bakugou katsuki#bakugo katsuki#mha bakugou#shoto todoroki#mha shoto#midoriya izuku#mha midoriya#deku midoriya#mha deku#deku
226 notes
·
View notes
Text

447 notes
·
View notes
Note
Do you have tips on uploading trad art to tumblr and not having it look scuffed as all hell 😭😭😭 your art looks great pls share your secrets
Aaaa, thank you! I actually decided to shift my focus back to traditional art very recently and it means a lot to hear that ;;
I hope this helps you and anyone else with similar questions!!
So I have two methods that I usually rely on when capturing my traditional art.
The first one is kind of limited, but it is faster and more accessible.
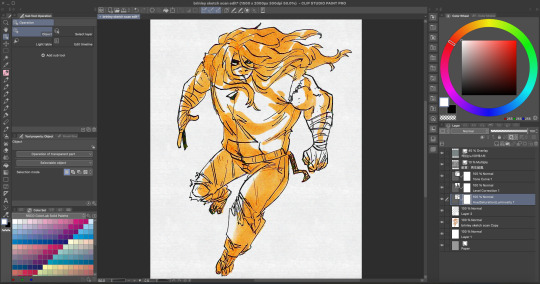
For these demonstrations, I'm going to use a colored sketch of my OC, Brinley.
Step One: Taking Your Photo!
All you'll need for the first method is your phone.
What you want to do first is to find an area with nice, even lighting- the less warm, the less you'll have to correct later, so the closer to daylight, the better. In fact, using the light outside is a great way to capture your art!
Note: If you are in a place with very cool lighting you will also have to correct the colors, but in my experience, cooler light is easier to work with.
Position your artwork so it's illuminated with the light source directly in front of you. If it is behind you, it will be harder to get your shadow out of the shot. The spot I was in had my light source behind me, so my arm covered it a bit.
I repositioned myself to a spot with the light source in front of me instead, and I was able to get a nicer shot.
Keep your phone as level as possible over your drawing, and as close as possible without your phone going out of focus.
And now the first step is done!
Step Two: Editing Your Photo!
This is where everything starts to come together!
Firstly, crop your drawing to your preference.
I try to keep the negative space around my art as even as possible. IPhones have a handy feature where you can choose an even aspect ratio, so that will help keep things simpler if you want.
Next, all you have to do is mess with the settings until you get it how you want it to look.
Filters can help it to look more cohesive.
I like to keep the art close by me to reference so I can get it to look as close to real life as possible.
Note: black and white art is the easiest to edit due to the high contrast.
Finished!
Congrats! Your art is ready to post! Here's what my sketch looked like after I added a vivid filter and then messed with the settings.
The second method can be a bit more difficult, but the results always look better than just taking a photo.
What you'll need is a computer (I think you can also use an ipad- any device will work as long as it can connect to the scanner), a scanner and any art/photo editing software.
Step One: Scanning!
The scanner I use is technically used for office work, but can be used to scan photos, therefore the quality is very much in the middle. There are scanners that are used purely for scanning high quality images of art and photography that will produce much better results on the initial scan, but this works just fine! There are also stores and other places where you can scan your work even if you don't own a scanner.
First, make sure your art is as flat as possible and in the middle of the scanning bed.
It doesn't have to be perfectly straight as it can be edited later, but if it isn't flat or it's on the edge of the bed, it will end up blurry in some areas or completely cut off.
After that, go to your device and set the resolution to at least 300 dpi to guarantee a high quality scan, and then begin.
This is what my sketch looked like after the initial scan.
Now we can move onto the next step!
Step Two: Editing!
You may have noticed that the colors are very washed out- scanners that aren't optimized for art and photos tend to do this, but with some editing, it'll look great!
After opening it in CSP and selecting a canvas size, it's ready to edit!
Note: Opening the image directly will automatically set the document's dpi to 72. Idk if that's a constant for other programs, but this means the overall image quality will be very low, so the picture has to be imported into a higher quality document with dpi set to 300 manually. I usually just copy and paste it into another document.
Level correction is your friend! That's the correction layer I use the most when editing and it does the most heavy lifting, usually.
After that, I sometimes edit the saturation.
Since this is a digital method, you can edit your drawing however you want! You can fix some mistakes this way, or completely change things.
There were notes and a sketch next to this drawing that i didn't want, so i painted over them with white- since i edited the level correction to up the exposure, the painted areas are indistinguishable from the background.
Finally, I add either a gradient map for cohesion or fiddle with the tone curve until I'm happy with the final product.
Once again, I like to keep the original art next to me while I'm editing for reference.
(And then after that I might add a noise filter or some other effect, LMAO)
Finished!!
And now you have your scanned art!
These are all the editing layers I used!
Like with anything, trial and error are very important! You'll get better at editing art over time, so don't be discouraged if it doesn't look like you wanted it to the first time.
Thank you for the ask, bye!!!!!!!
#tutorial#art tips#art tutorial#art tutorials#art resources#drawing tips#traditional drawing#traditional illustration#traditional art#art help#tutorials#resource#references#useful#marker art#copic markers#copicsketch#copicdrawing#copicillustration#tips#tips and tricks#art how to
15 notes
·
View notes
Text


“The Beginning of a Life”
My entry for Copic Award 2022
#art#drawing#illustration#illustrator#artist#tumblr draw#copic#copicillustration#ink#copicdrawing#copicsketch#fabercastell#colorful#magical art
231 notes
·
View notes
Text

it's not really May the Forth yet but if I don't post this now, I'm gonna forget.
So please take this angsty drawing that @lorrainestea requested about an hour in advance of May the Forth!
Sorry that it's a bit grainy, but I tried really hard to photograph this better
#din x bo#may the forth 2023#may the forth#may the forth be with you#star wars#the mandalorian#dinbo#din x bo katan#bo katan kryze x din djarin#din djarin x bo katan kryze#bo katan x din#bodin#din djarin x bo katan#dinbo fanart#the dinbo agenda#bokadin#my art#traditional art#copicsketch
99 notes
·
View notes
Text
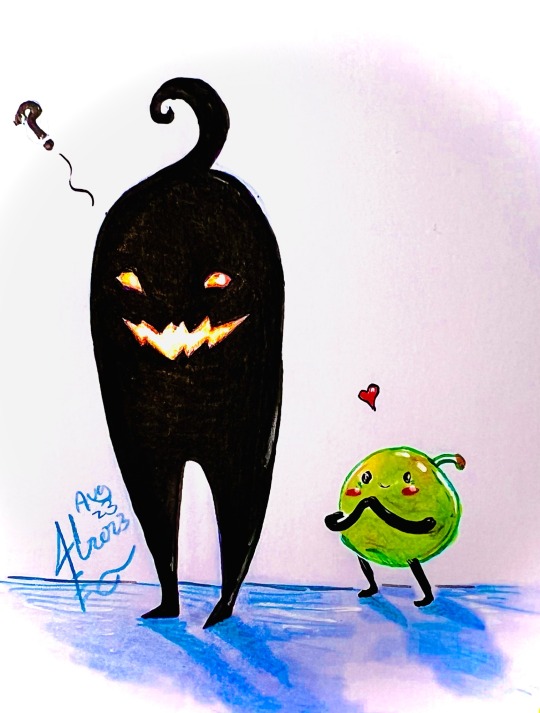
Krobus and his adorable shadow
129 notes
·
View notes
Text
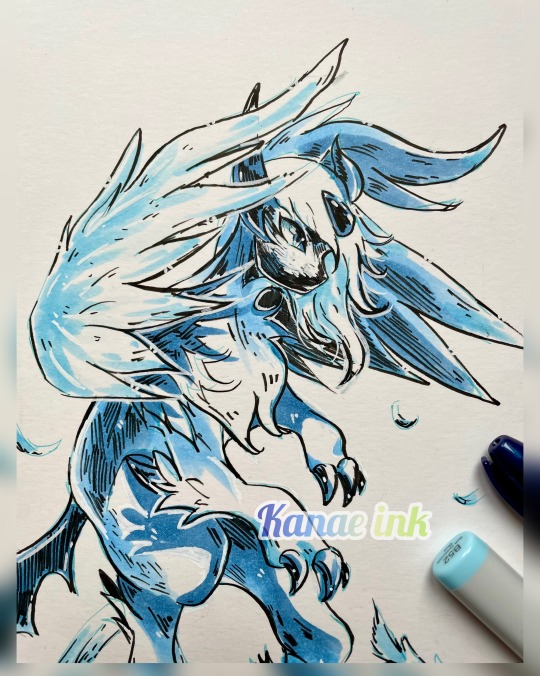
Ninetails
Ninetails with blue flames drawing 💙💙
I’ve been using this piece as my page header so thought it’s time to share the full artwork.
By Kanae ink (Wilson Pikachu)
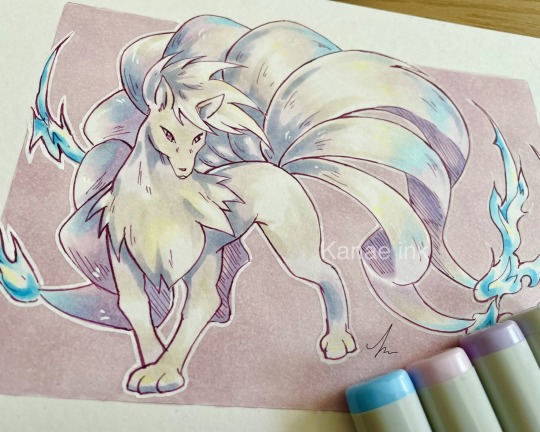
#pokemonart#alola#alolaregion#alolanninetales#ninetails#foxart#Pokemon#pokemonsun#pokemonmoon#pokemondrawing#pokemonartwork#copicsketch#copicmarkers#pokecenter#icepokemon#firepokemon#vulpix
58 notes
·
View notes
Last Seen Blogs

agatha-m
* cosas imposibles
salthaven
A simple soul who likes writing fanfiction

hotelt3
Hotel T3

pcdpharmafranchise0
Untitled

collincroome
Collin Croome